April 2, 2025
Benefits Reconciliation UI Overview
Invoice List View
When you launch Reconciliation for the first time, you’ll land on the Invoice List View. From there, everything you need is available through a clean and intuitive layout. Let's walk through each part of the screen from top to bottom.
Top Navigation

Hamburger Menu (top-left): lets you switch between Payroll and Enrollment reconciliation views.
Reconciliation Period Selector: just below the menu, you’ll find the month selector. Click on it to pick the reconciliation period. Tabulera supports one month at a time, keeping things focused.
Statistical Panel

This panel gives you a quick summary of your current reconciliation progress. It shows:
- Beginning Variance – the total amount off at the start.
- Resolved Amount – how much you've already explained or written off.
- Over Collected – extra payroll deductions compared to what was invoiced.
- Under Collected – missing payroll deductions compared to the invoice.
- Discrepancy Count – the number of employees with variances, including how many are currently marked as In Progress.
- Plan Balance – how much has been collected and adjusted for the plan since inception. You can view the plan balance across all time, or narrow it down by selecting specific effective dates. Tabulera creates employee plan-level transaction registers, so you have a clear balance history down to the penny.
Invoice List
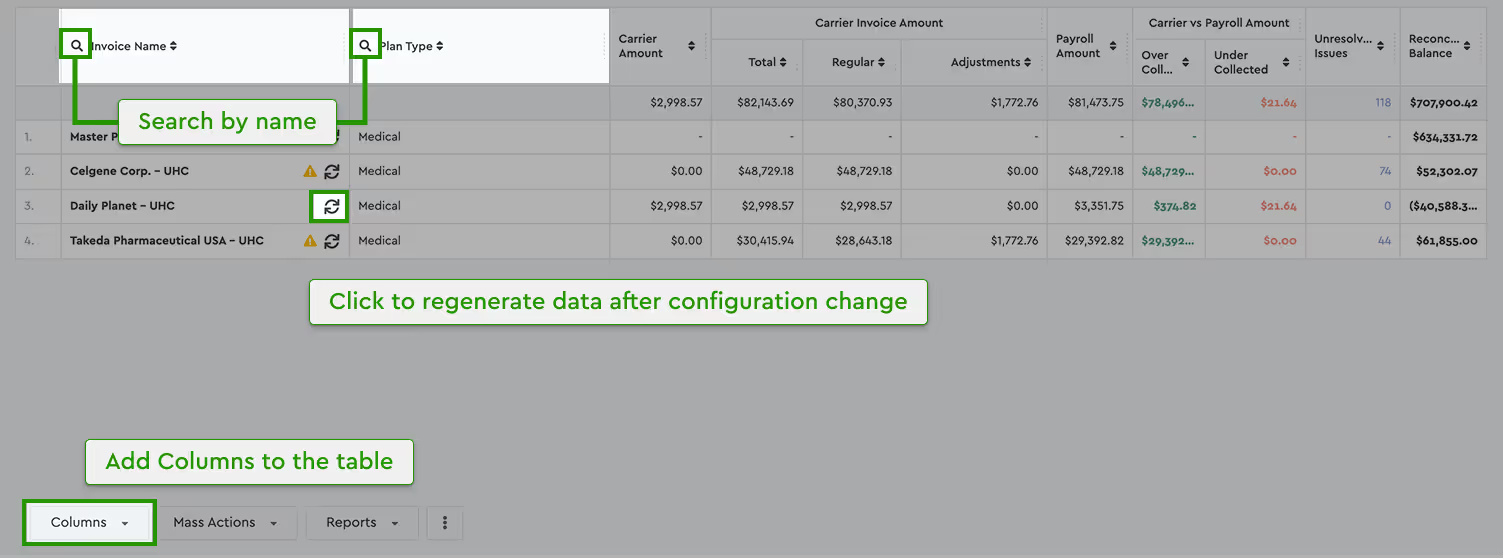
Here you’ll see all the uploaded invoices for the selected month, along with key statistics.
- The table is fully configurable: enable or disable columns by clicking the Columns button in the bottom-left corner.
- You can search within the Invoice Name and Plan Type columns by clicking the column header.
- To apply changes to invoice mapping or settings, use the Regenerate button next to the invoice name.
- You might also see different invoice statuses—these indicate if action is needed.
- Columns can be resized or sorted. Drag the dotted edge to resize or click the sort icon.
Employee List View
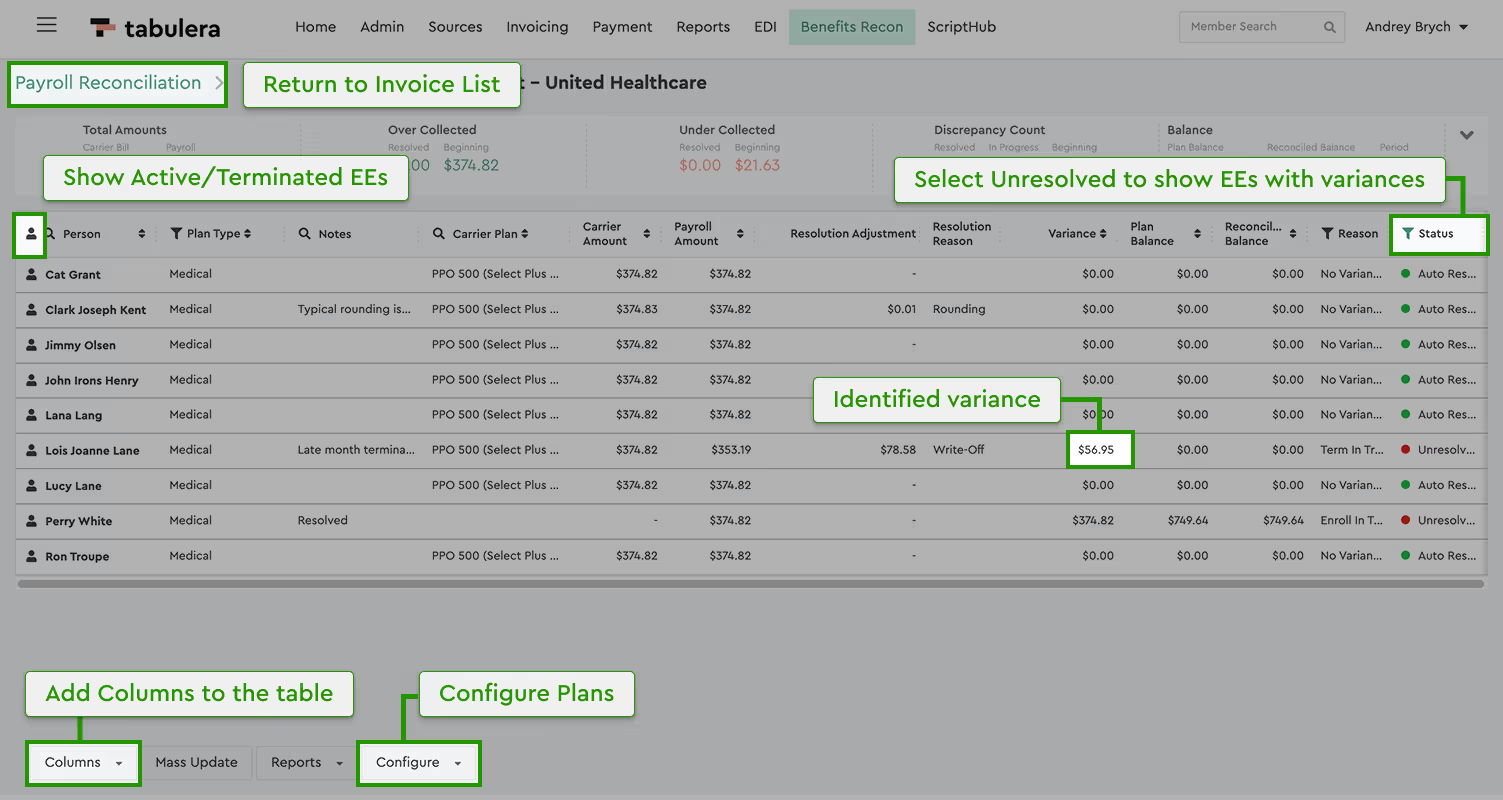
Click on any invoice to open the Employee List View. The layout is similar to what you’ve already seen, so it should feel familiar.
Statistical Panel
The panel at the top of this view changes depending on the reconciliation type you're working with.
Payroll Reconciliation
It’s almost the same as in the Invoice List View, but with one extra tile:
- Total Amounts – shows the total from the carrier invoice and payroll data side-by-side.
Enrollment Reconciliation
Switching to Enrollment Reconciliation updates the panel:
- Total Amounts – totals from both the carrier and the enrollment system.
- Plan/Tier Mismatch – employees with mismatched tier coverage.
- Rate Mismatch – employees with different rates.
- Carrier Bill Only – employees who are on the invoice but not in enrollment.
- Enrollment Only – employees in enrollment but not on the invoice.
- Discrepancy Count – number of employees with a variance.
- Plan Balance – running balance over time, filterable by effective date.
Employee Table
This table shows all employees listed on the invoice.
- Person, Carrier Plan, and Notes columns are searchable.
- A small person icon shows active/terminated status—click to filter.
- Use the Columns button to select which columns are visible.
Available Columns:
- Person
- Color Tag
- Client ID
- Plan Type
- Notes
- Enrollment Plan
- Payroll Plan
- Carrier Plan
- Carrier Premium
- Carrier Amount
- Payroll Amount
- Resolution Adjustment
- Resolution Reason
- Variance
- Plan Balance
- Reconciled Balance
- Reason
- Status
Utility Panel
The bottom panel contains tools designed to speed up your work.
- Columns: Show or hide fields in the Employee Table.
- Mass Update: Apply bulk updates to selected employees:
- Add notes
- Change statuses
- Update color tags
- Mass Refresh: Re-run reconciliation after updates.
- Mass Adjustment Upload: Upload templates for Beginning Balance, Write-offs, or Adjustments.
- Reports: Generate and download reconciliation reports. More on this in the [Reports article].
- Three-Dot Button: Clear the app cache after backend updates.
- Configure Button: Access Plan Configuration and Member Mapping. Each has a dedicated article.
Employee Detail View
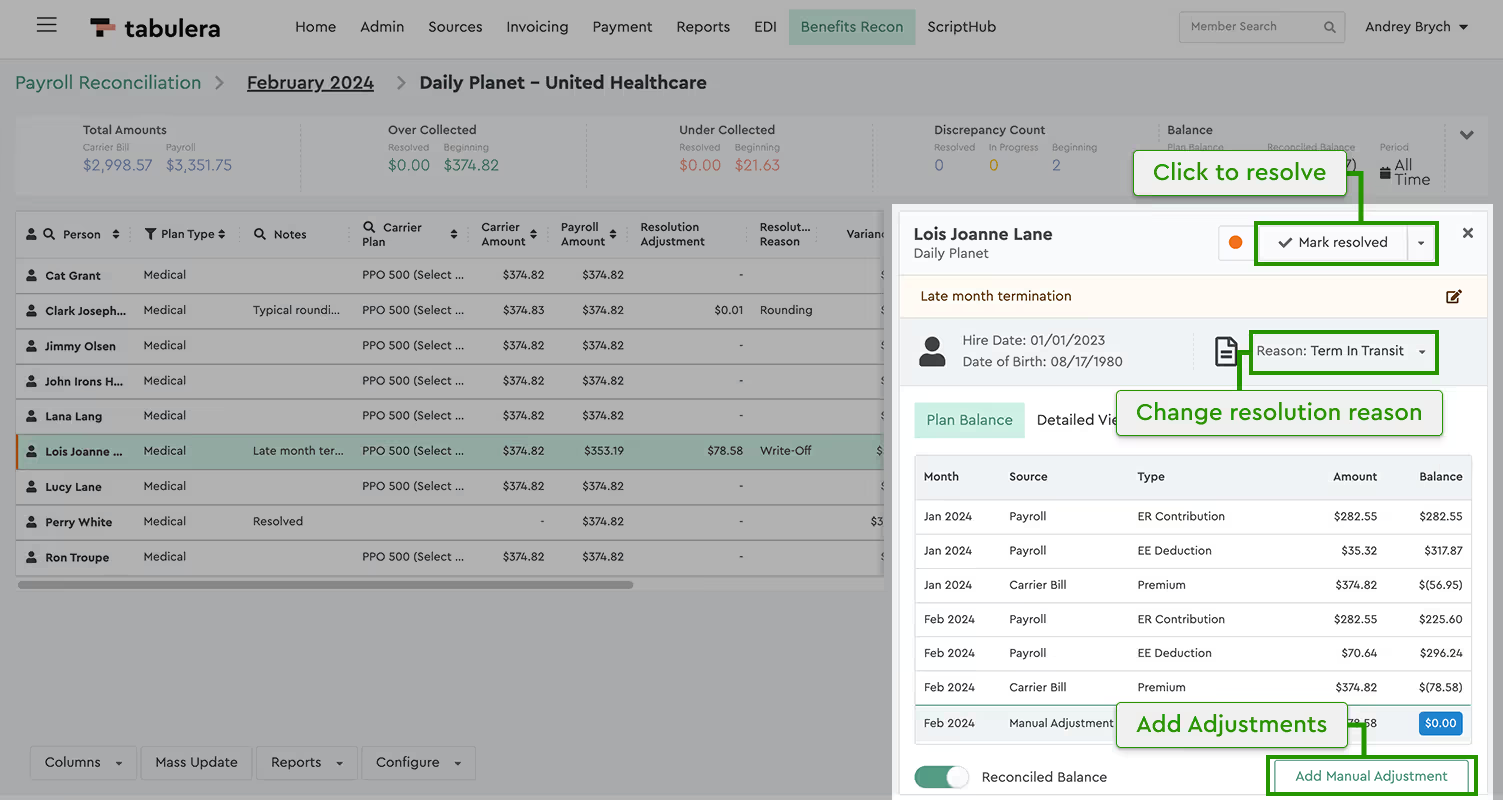
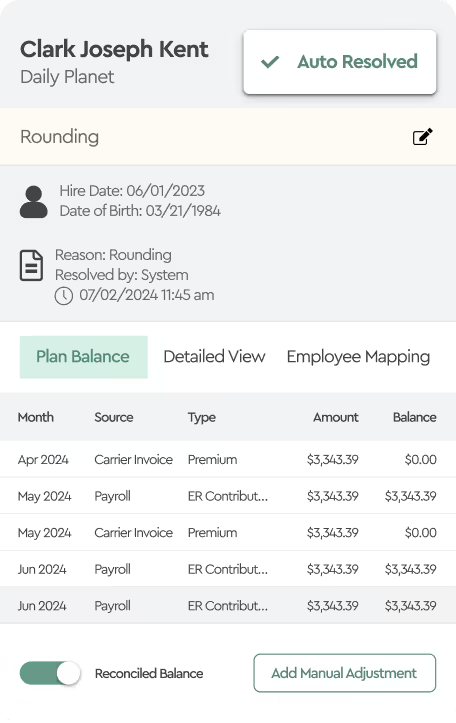
When you select any employee in the Employee List View, the Employee Detail View panel slides in from the right.
Top Section
- Employee & Employer Name – shown on the left.
- Color Picker – tag employees for easier identification.
- Resolution Button:
- Shows Auto Resolved and is locked if no discrepancies are found.
- If discrepancies exist, use Mark Resolved to update and sync stats.
- Dropdown options:
- Mark In Progress
- Mark Resolved for Prior Periods
Notes Section
Add internal notes related to this employee. Use Mass Update in the Utility Panel to apply notes to multiple employees.
Middle Section
- Left: Demographics, hire and termination dates.
- Right: Resolution reason, who resolved it, and when.
Bottom Section
Five tabs give you deeper visibility:
- Plan Balance – Detailed transaction register for each plan.
- Detailed View – Shows plan-level info and paycheck data. Download via Payroll Paychecks button.
- Member Mapping – Manage mappings at the member level. See the dedicated article for full instructions.
- Plan Mapping – Edit plan-to-plan mappings. A full guide is available.
- Activity Log – Tracks all user actions within the Benefits Reconciliation Module. See the Activity Reports article for more.
The Plan Balance tab acts as a running ledger of all financial transactions tied to the employee’s benefit plans. It gives you a detailed view of how premiums have been collected, adjusted, or written off over time. Two key tools in this view help you maintain accuracy: the Manual Adjustments button allows you to post Beginning Balances or apply Write-offs when needed. The Reconciled Balance toggle lets you switch between the actual balance and an adjusted view that accounts for payroll frequency differences, helping you align more accurately with carrier billing cycles.


