June 18, 2025
A Step-By-Step Guide to Benefits Reconciliation (Updated)
For HR and Benefits professionals, reconciling employee benefit plan invoices is a critical task that cannot be ignored. However, in understaffed departments, accounting work can often take a backseat due to time constraints and limited resources. Ignoring this work can result in serious consequences such as non-compliance, financial penalties, and dissatisfied employees.
The good news is that the Tabulera, now in its latest version 3.2, provides a user-friendly solution that streamlines the reconciliation process, ensuring accuracy and saving time. This guide will take you through the step-by-step process of reconciling employee benefit plan invoices using Tabulera 3.2, giving HR and Benefits professionals the tools they need to effectively manage accounting work and mitigate potential risks.
If you're an employer with under 500 employees, you can start your 30-day free trial of Starter Edition and explore the platform hands-on.
Home Dashboard review
Log in to the Tabulera Portal and access the Home Page, offering an overview of key metrics related to your employee benefit plans. The user-friendly and intuitive design of the Home Page facilitates easy navigation through various features of the Tabulera platform.
The Home Page dashboard presents statistical information on the left and financial details on the right, complemented by a navigation bar along the top.

Our primary focus will be on the Sources and Benefits Reconciliation links in the main menu.
Let’s walk through a step-by-step process that starts with uploading the source data files, then reconcile an insurance carrier invoice and look at our reconciliation reports.
Upload Source Data Files
Sources menu
Uploading the relevant source data is the first step in reconciling employee benefit plan invoices using the Tabulera platform. This is a crucial step in ensuring that accurate data is used to reconcile the invoices. The type of source data that needs to be uploaded includes enrollment data, payroll data, COBRA data, and carrier invoices.
At the top of the page, you’ll notice a Date Ribbon for your coverage periods and along the left navigation menu we have the four data sources we need to load to complete a reconciliation. These data sources include your enrollment, payroll, COBRA and your carrier invoice data.
Enrollment Data Upload
Let's kick off the data upload process by focusing on the enrollment file. Click on the "Re-upload" button and select the enrollment report file from your local computer. It's crucial to ensure the file is accurate and reflects the most up-to-date information for the respective period.
Payroll Data Upload
After managing the enrollment data, navigate to the payroll menu. Click on "Add File" to upload the payroll report specifically for January 2024 from your local computer. Once this upload is complete, proceed to the subsequent month, February 2024, and repeat the same procedure. Verify that each payroll report aligns seamlessly with its corresponding month.
Invoice Upload
Next, for the purpose of demonstrating how to resolve timing discrepancies we will upload two invoices, one for January and another for February 2024. Locate the Daily Planet – UHC invoice and click on the "Upload" button next to it. Then, locate the respective invoice in your local file system, downloaded previously from the insurance carrier website, and click "OPEN." Observe the status of the invoice changing to "Processing," soon transitioning to "Completed," indicating the successful upload. Repeat this process for the February 2024 invoice.
Congrats, we have successfully uploaded the source data and that we can move to the Benefits Recon Menu.
Start the Reconciliation Process
In this demo example, we will reconcile payroll deductions and employer contributions to the carrier invoice to look at any variances between these data sources and ensure we understand why the variances exist, add any adjustments, or notes to complete the reconciliation.
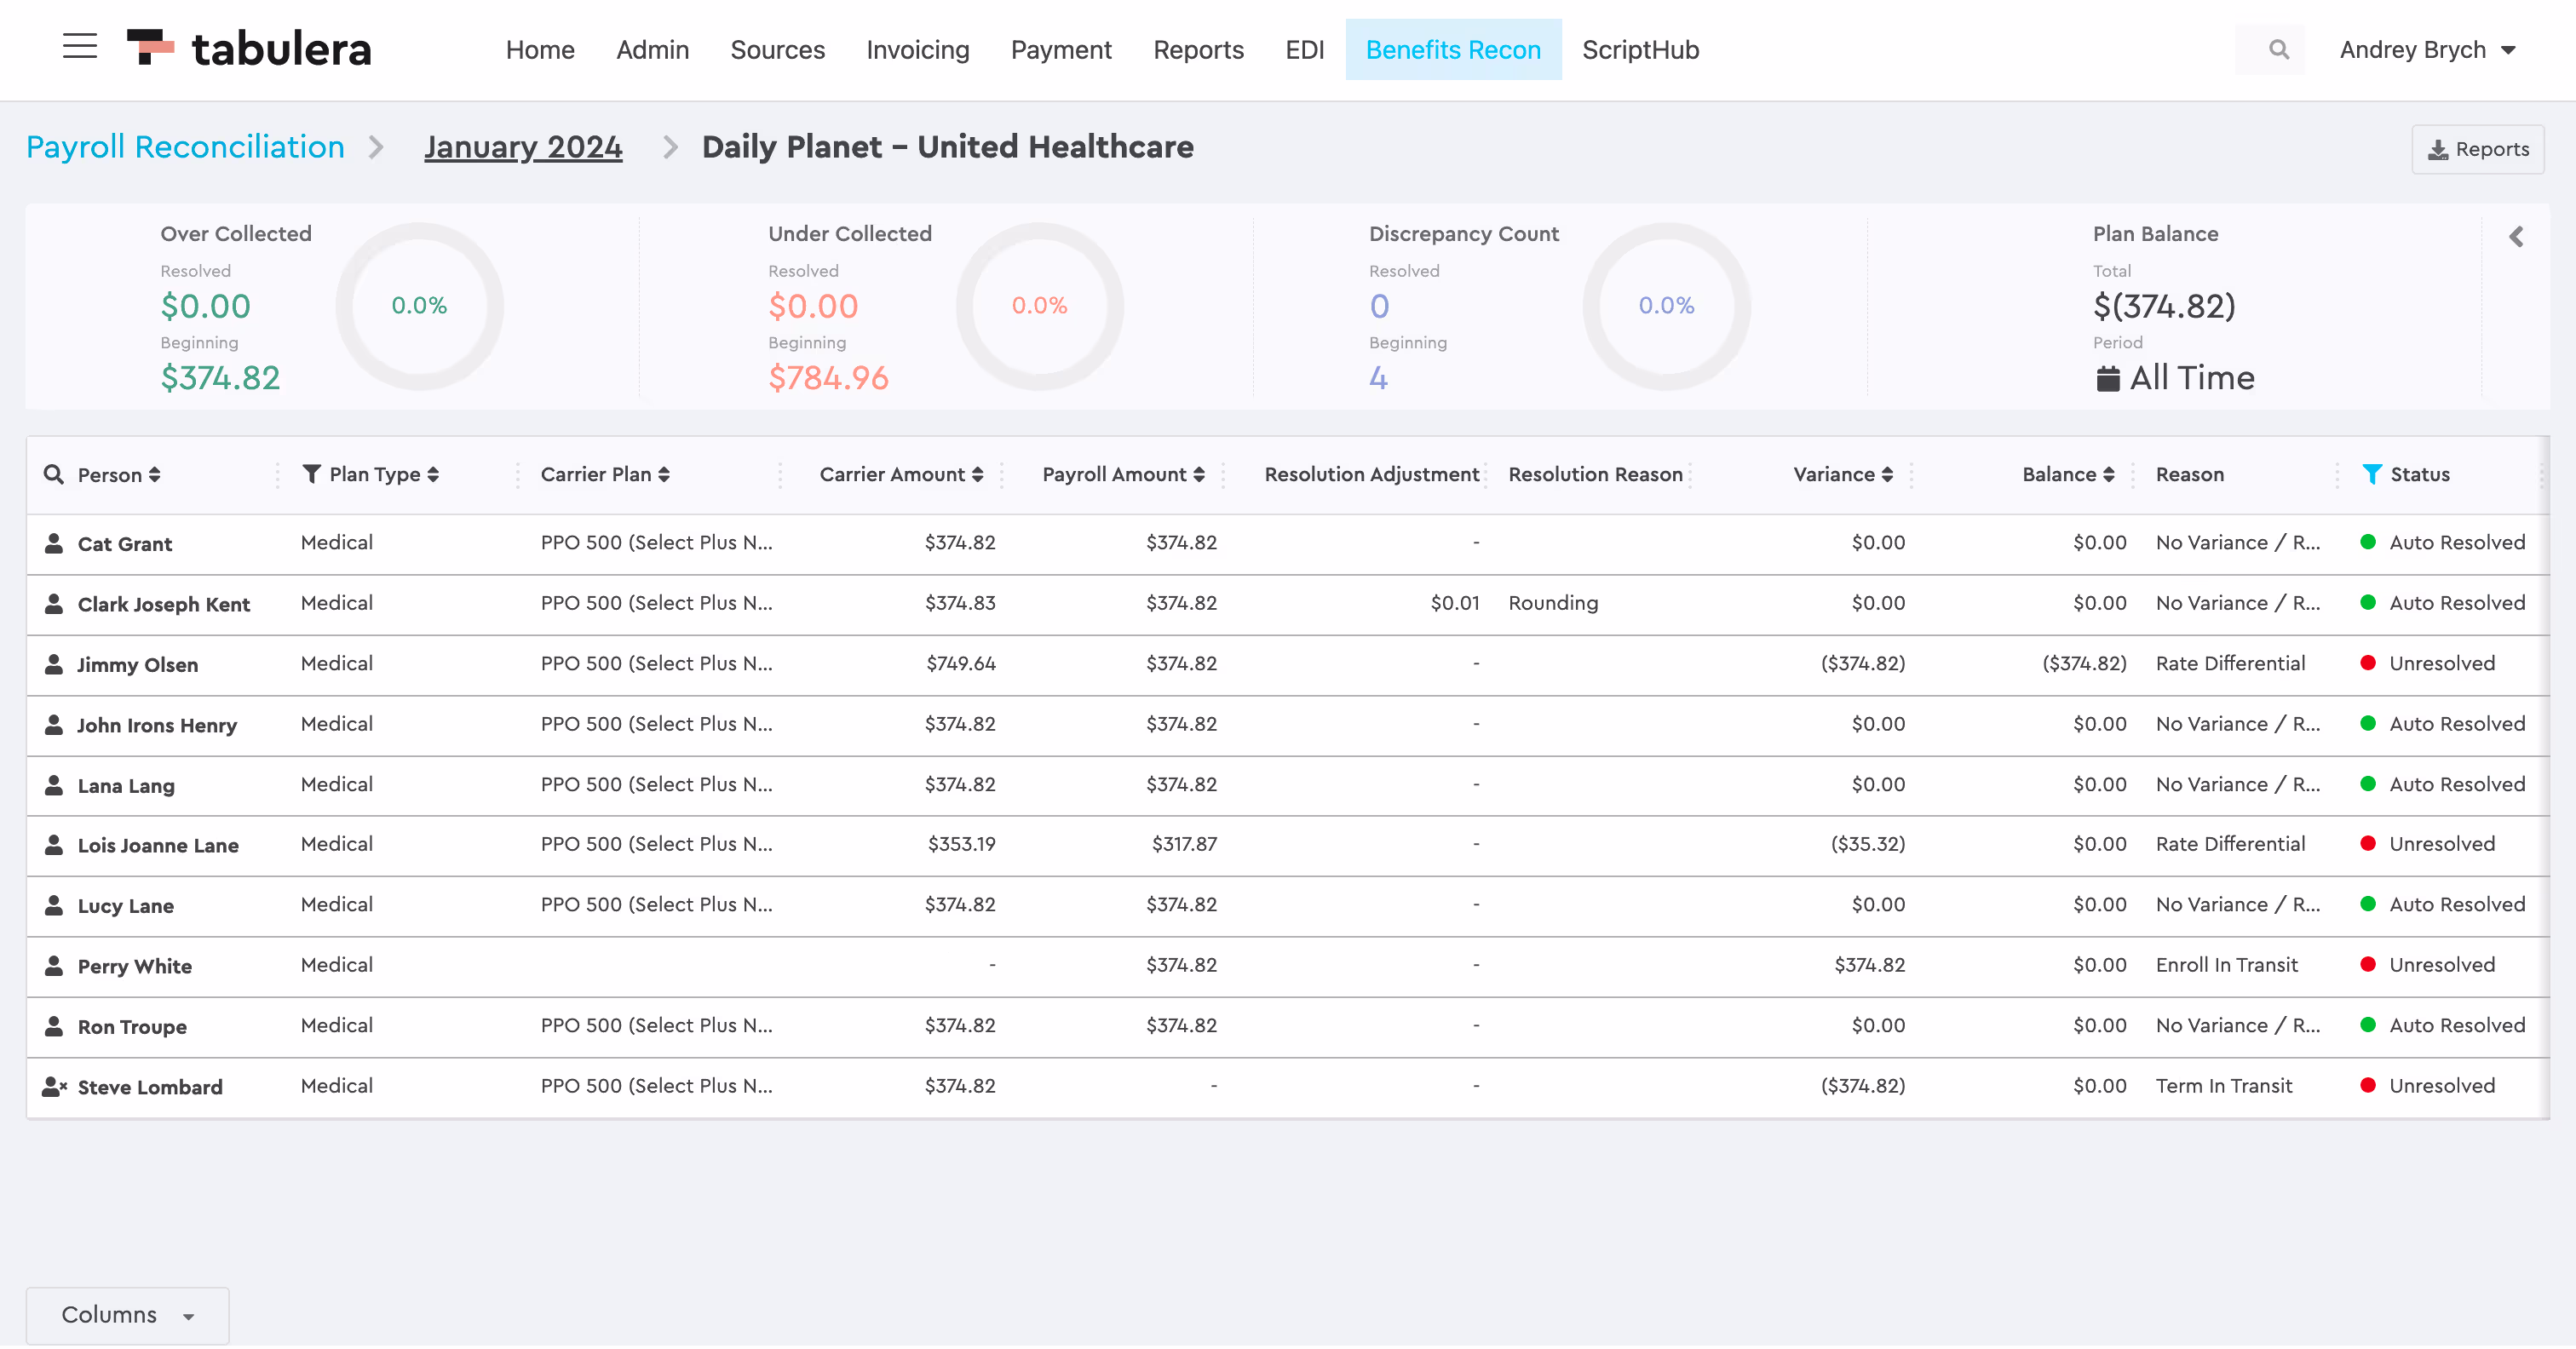
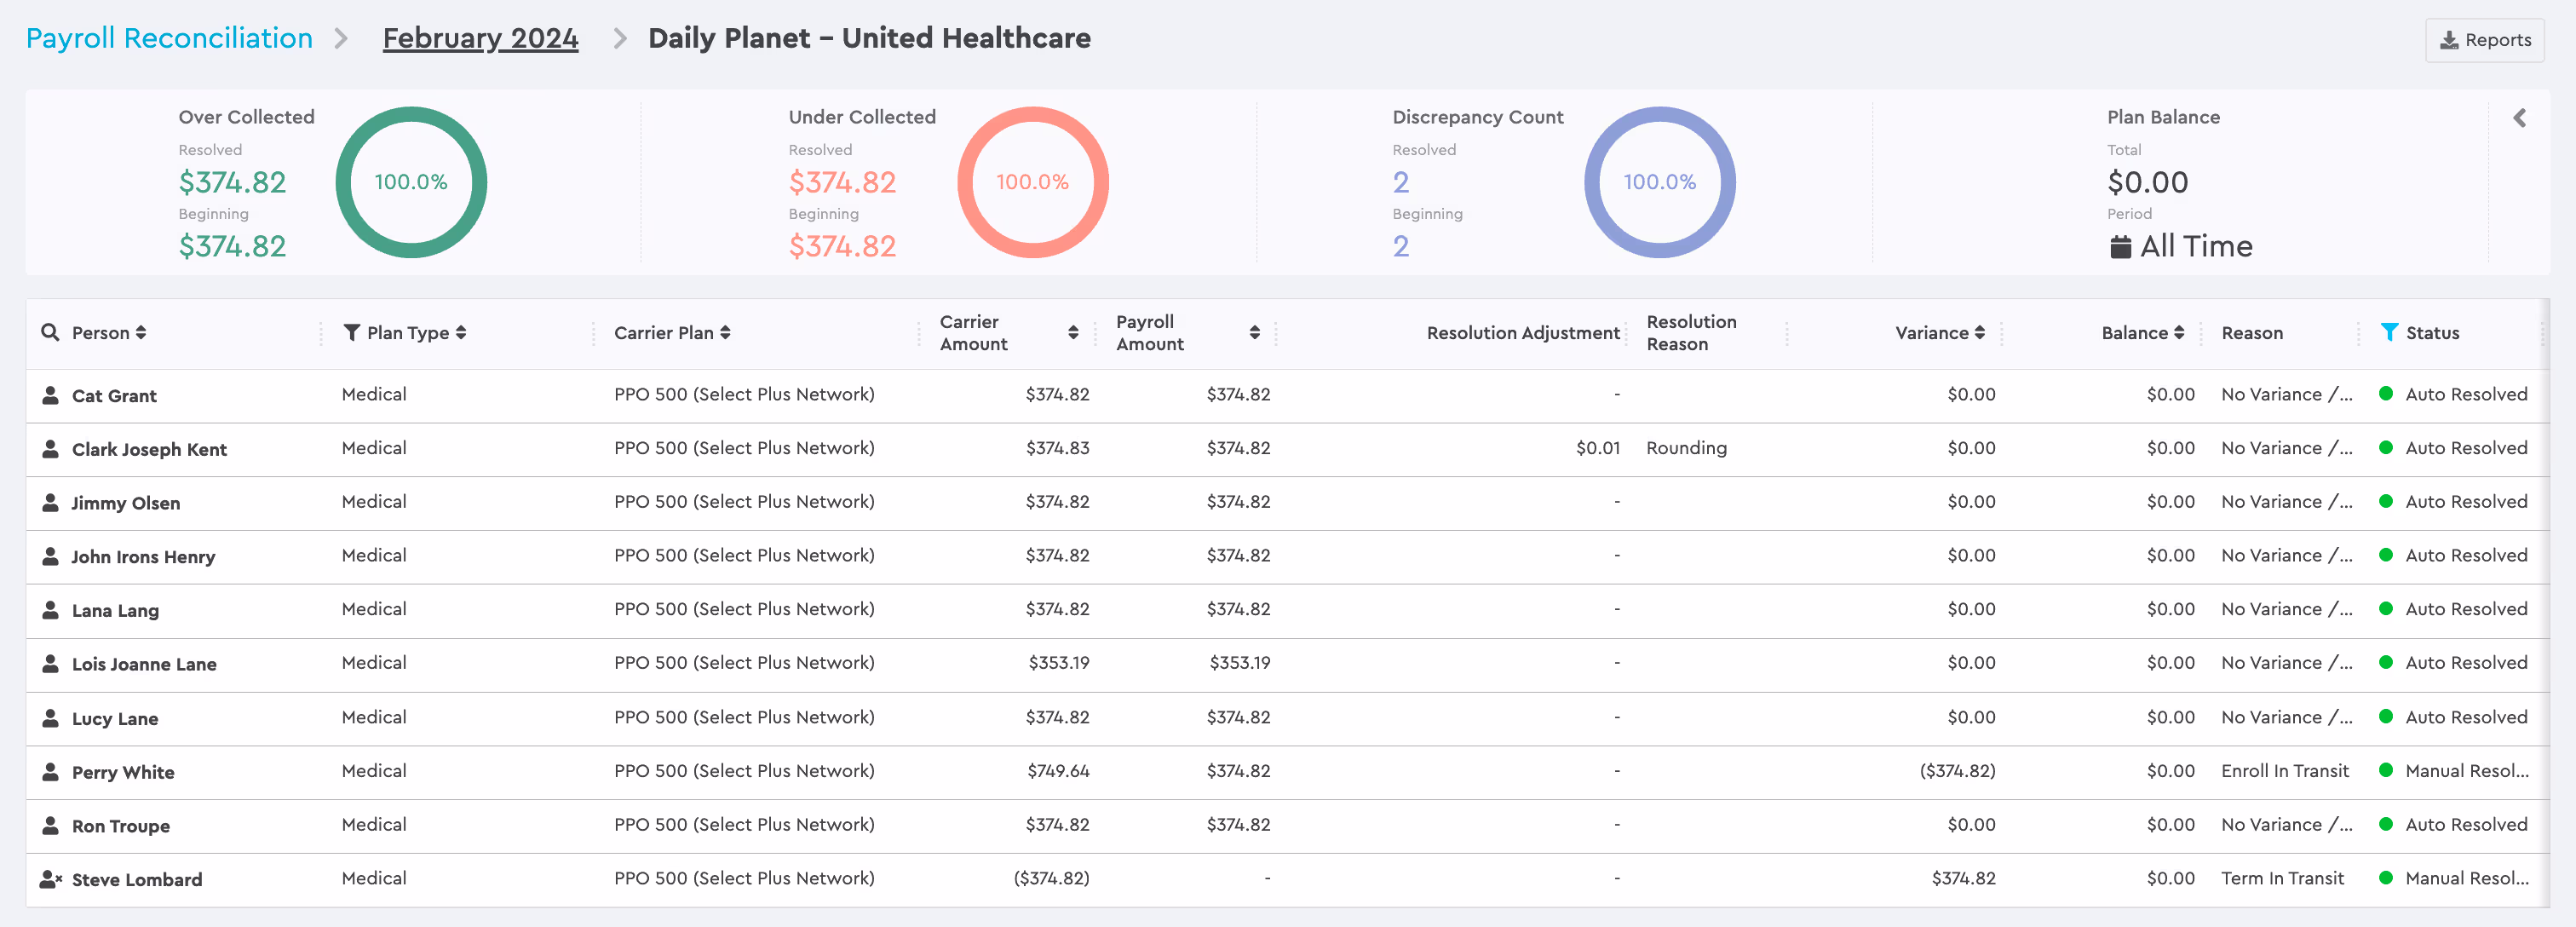
A dashboard at the top of the page summarizes progress on your current month's reconciliations.

The panel below displays a list of invoices, with columns indicating the invoiced amount for carrier premiums and another column reflecting the payroll amount, including employer contributions for the month. Additional columns indicate instances where you may have over-collected from certain employees compared to the invoice, as well as a column designating under-collected amounts from employees compared to the invoice. These columns usually represent timing differences for new hires and terminations. We also show the cumulative amount for each invoice variance over time in the Plan Balance column.

Since the invoices for Daily Planet have recently been uploaded - we have to click the 'Regenerate Reconciliation' button next to the invoice name.
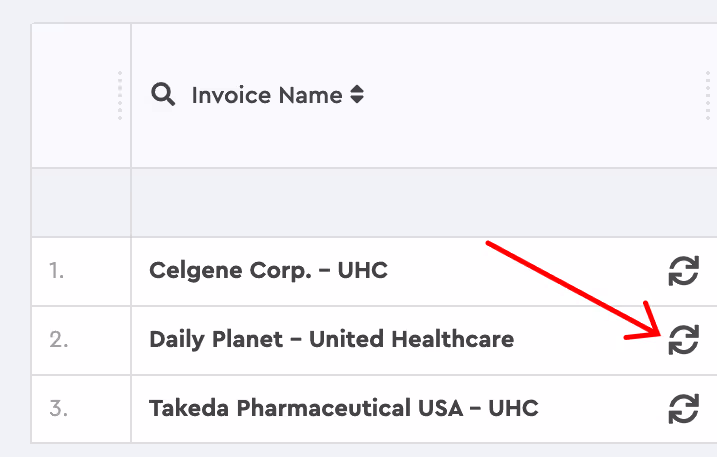
Let’s click on the Daily Planet UHC invoice line to look at the invoice line-item details.

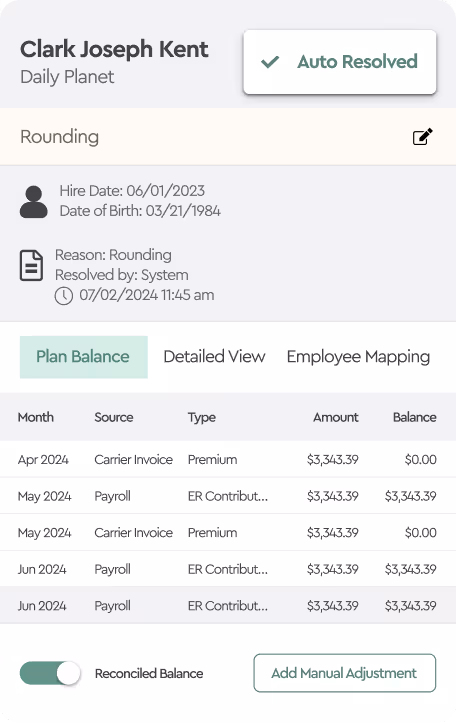
On the Details Page, you’ll see columns for Employee Name, Plan Type, Carrier Plan Name, the Invoice Amount, Payroll Amount, and columns for Resolution Adjustments, Resolution Reason, and a variance column for the month and a variance column for the Plan to Date. You’ll notice that one Resolution Adjustment for Rounding has already been made for our Employee “Clark Kent”.
Rounding discrepancy
If you click on his line item, you will see a panel for Clark Kent with detailed demographic data that pops out from the right, along with a history of transactions including Payroll Deductions, Employer Contributions, and Carrier Invoices, as well as a running Plan Balance for each month. The Plan Balance is expected to be zero every month, calculated as the sum of Payroll Deductions and Employer Contributions minus Carrier Invoices.
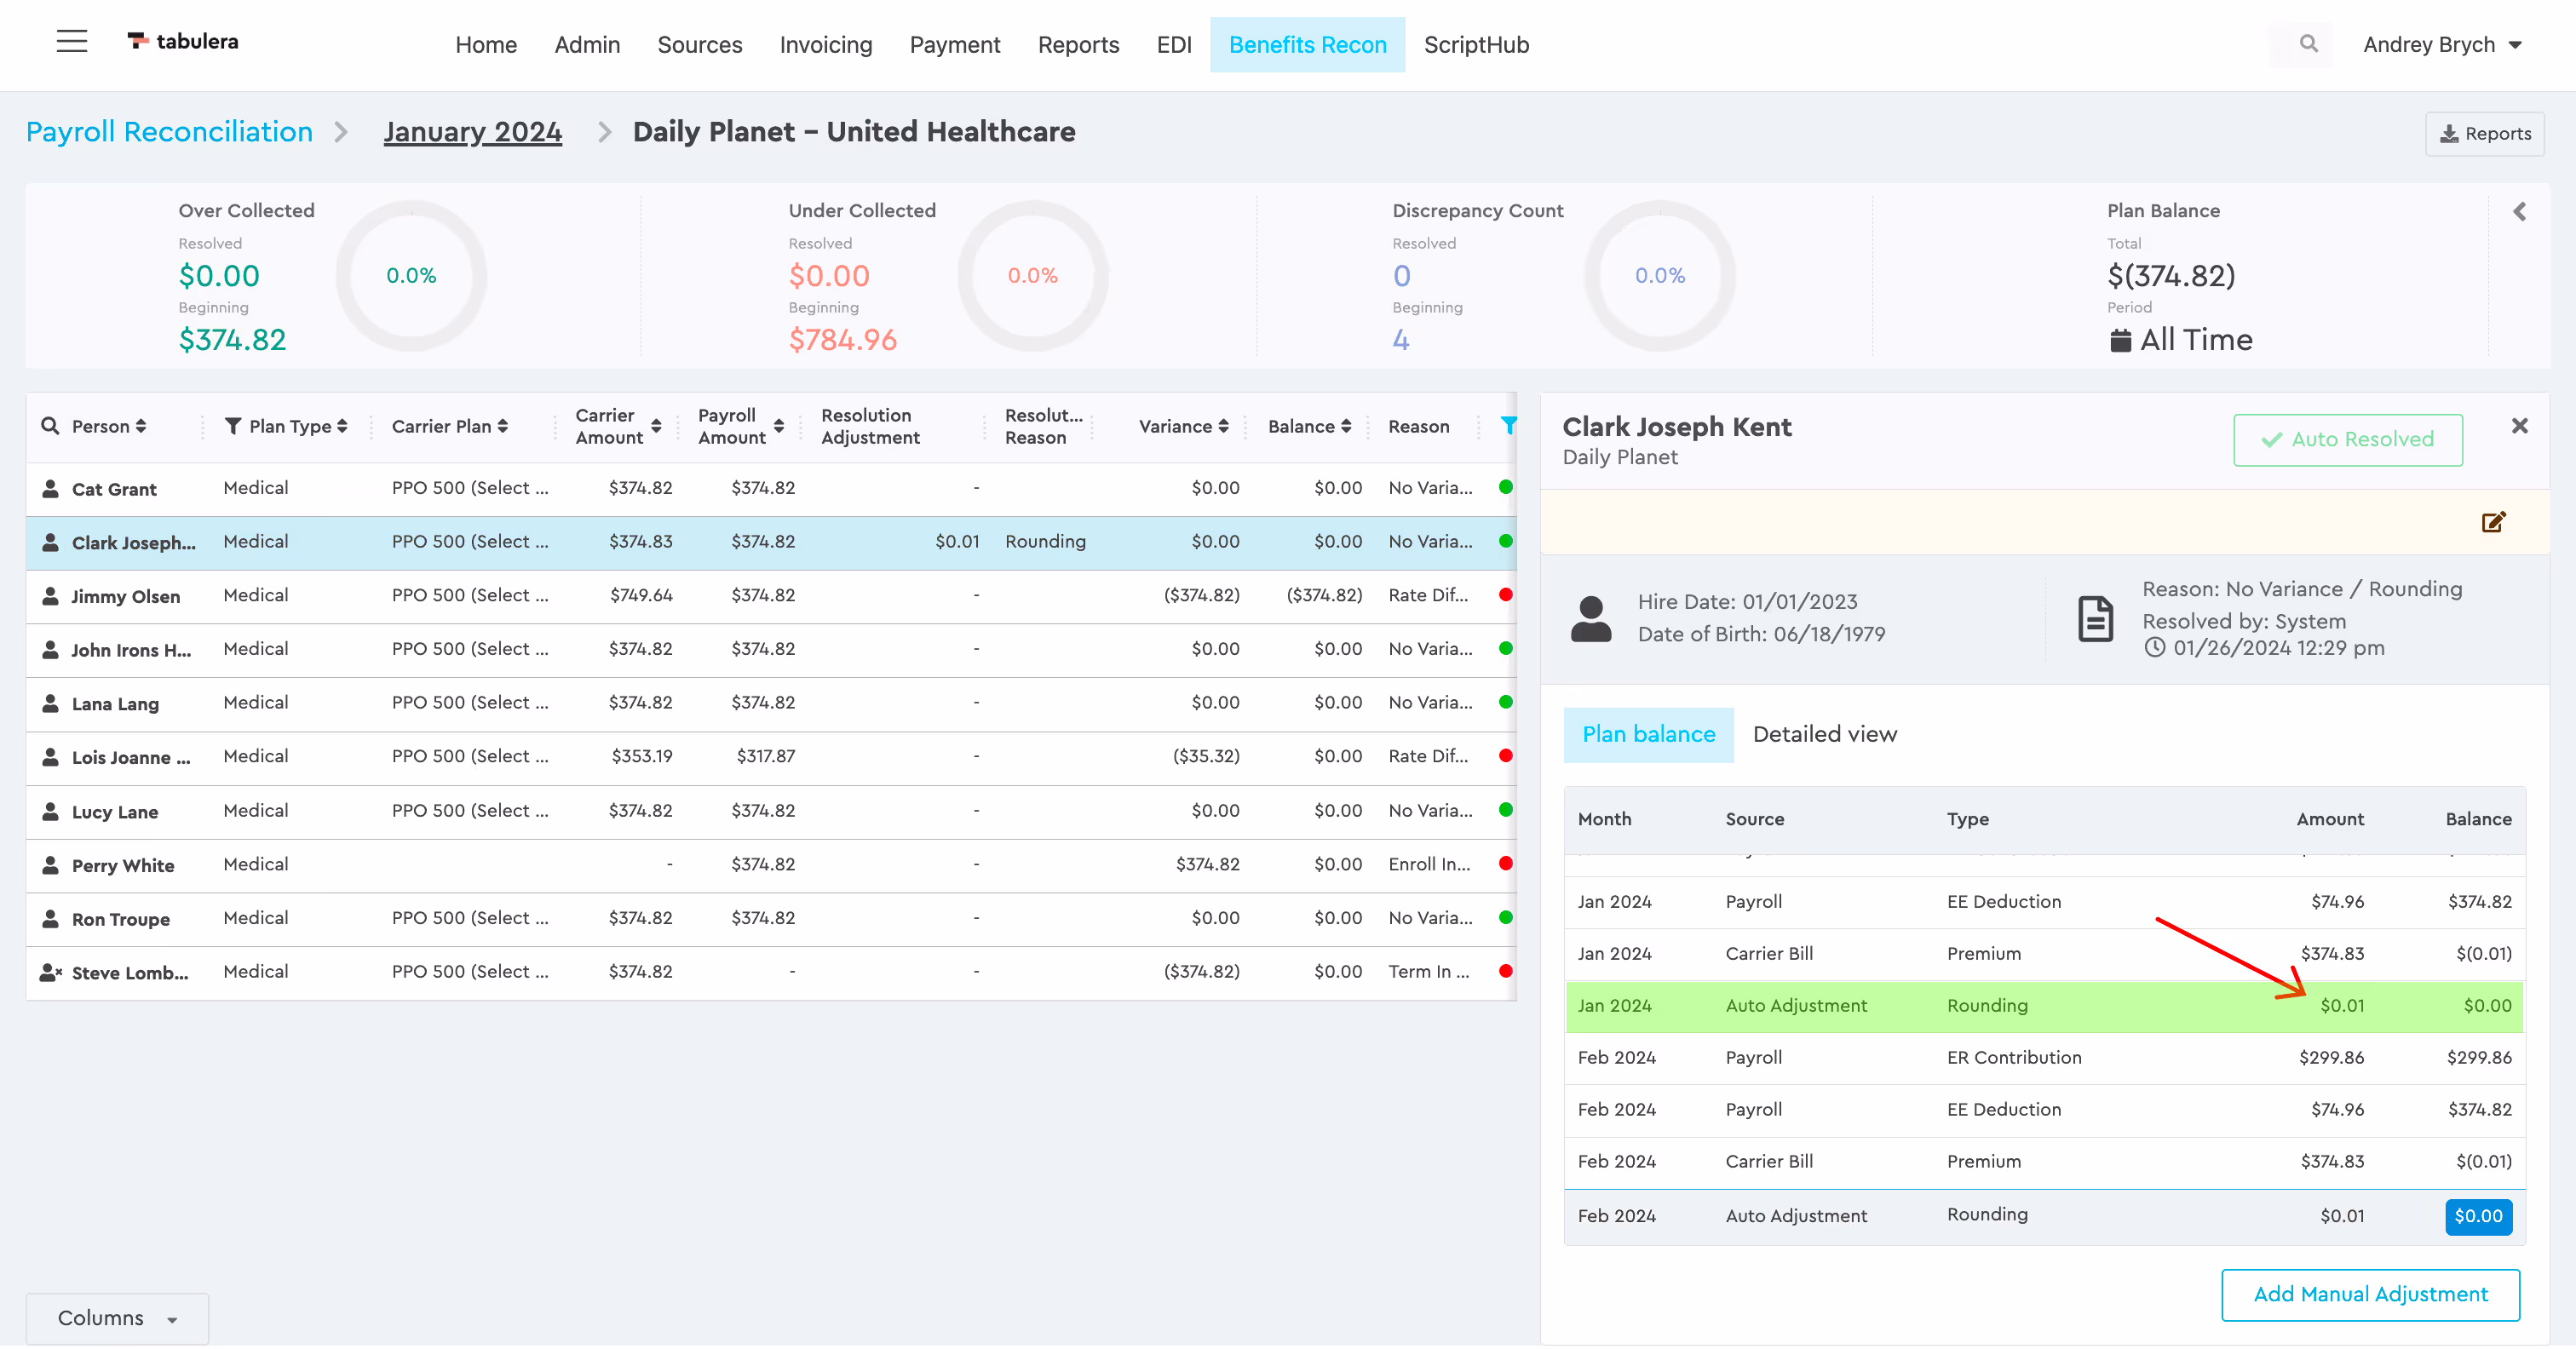
When invoices and payroll are uploaded each month, the system automatically assigns a variance reason. These reasons are helpful in categorizing possible variance causes such as rounding, timing, or configuration issues.
If no variance exists for an employee between the premium amount on the carrier invoice and monthly payroll deduction and employer contribution, the system will automatically mark the employee line items as “Auto Resolved” for the month. As you can see in the Plan Balance view, the Rounding Adjustment has been generated by the system for Clark Kent based on the company rounding rules configured during implementation.
Most transactions can be Auto Resolved by the system, but Manual Adjustments may be necessary in certain cases. Let’s examine a few of these cases.
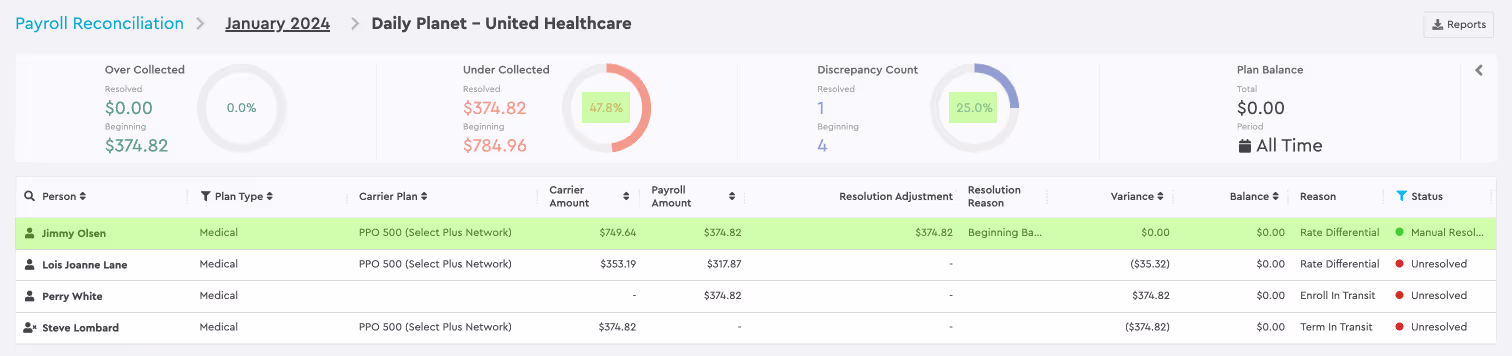
Click on the “Filter Funnel” at the top of the Status column to filter for only those transactions that are “Unresolved”. You'll notice four transactions marked with a red dot and a status of 'Unresolved'.
Rate Differential: Beginning Plan Balance
Let's click on the first employee in the list, Jimmy Olsen.
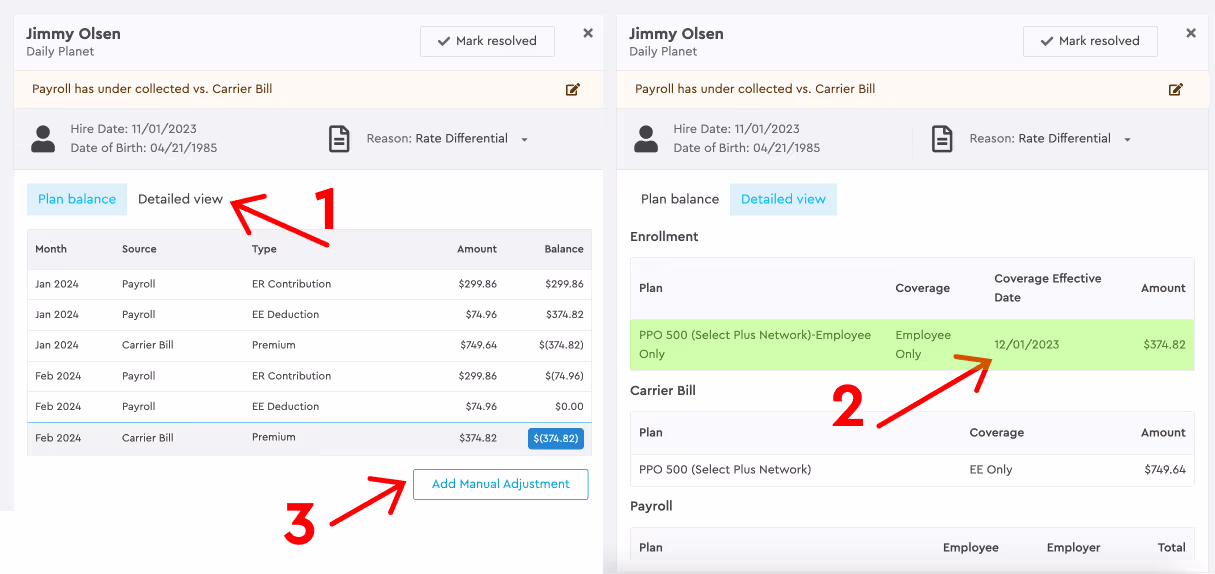
You'll notice that he appears to be a new hire, having been onboarded on November First, 2023. If we take a closer look at his coverage start date in the detailed view, it began on December First, 2023. The carrier is billing Daily Planet for coverage retroactively for a month, as indicated by the doubled premiums billed in January.
Since January 2024 is the first time Daily Planet has been reconciled on the system, we’ll Click on Add Manual Adjustment and create a beginning balance to Jimmy’s Plan Balance in the amount of $374.82, since we don’t have any payroll deduction transaction history prior to January 2024 for the Daily Planet. This lets the system know that this is a reconciling entry for January, and the balance is recorded in both the Carrier and your systems.

You’ll now notice that as the entry is made the employee’s Plan Balance becomes zero to correctly show the running balance for Jimmy’s medical plan and that the item has been marked as “Resolved”. The Resolution Adjustment and Resolution Reason columns are also updated, along with the Over and Under Collected Amounts and Item Resolved counts at the top of the page.
Rate Differential: Write-Off
We'll click on the next employee with a red dot and a status of 'Unresolved' - Lois Lane.
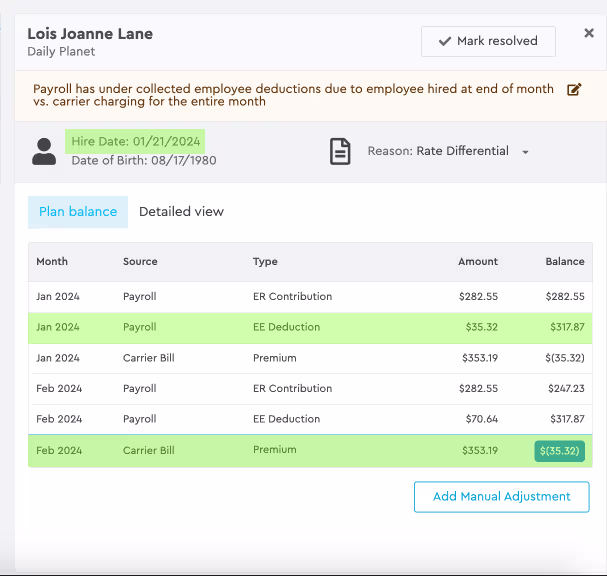
By examining Lois's details page, it appears she was hired in the last half of January 2024 and only had one payroll deduction for medical insurance premiums.
We'll click on 'Add Manual Adjustments' under the Plan Balance view, Use the January Coverage Period, select the 'Write-off' reason, and enter $35.32 to record the write-off per the company policy. This once again shows the employee with a balance of zero and the item with a 'Manual Resolved' status.

The Resolution Amount, Resolution Reason column information, and top-of-page metrics have also been updated to reflect your progress.
Enrollment in transit
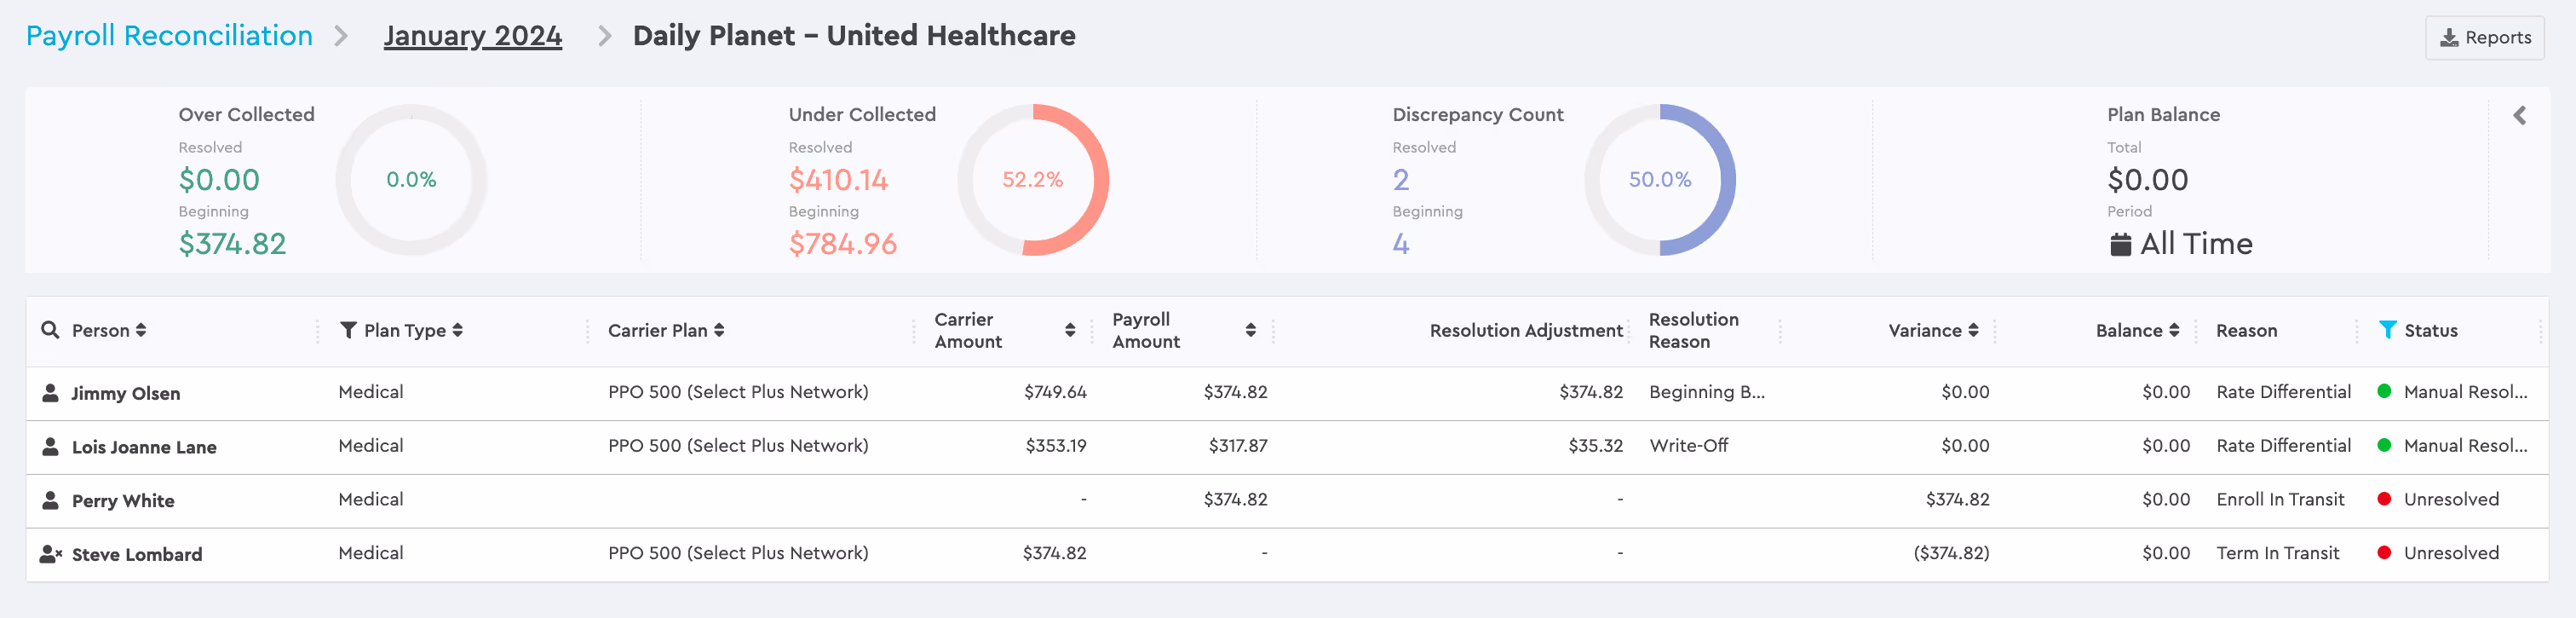
Next, we'll click on Perry White as he has an 'Unresolved' status as well. Perry is also a new hire with a Payroll Deduction Amount but hasn't yet shown up on the carrier invoice (You can notice a missing premium in the section highlighted in red). The system has automatically marked him in this status as 'Enroll In Transit.'
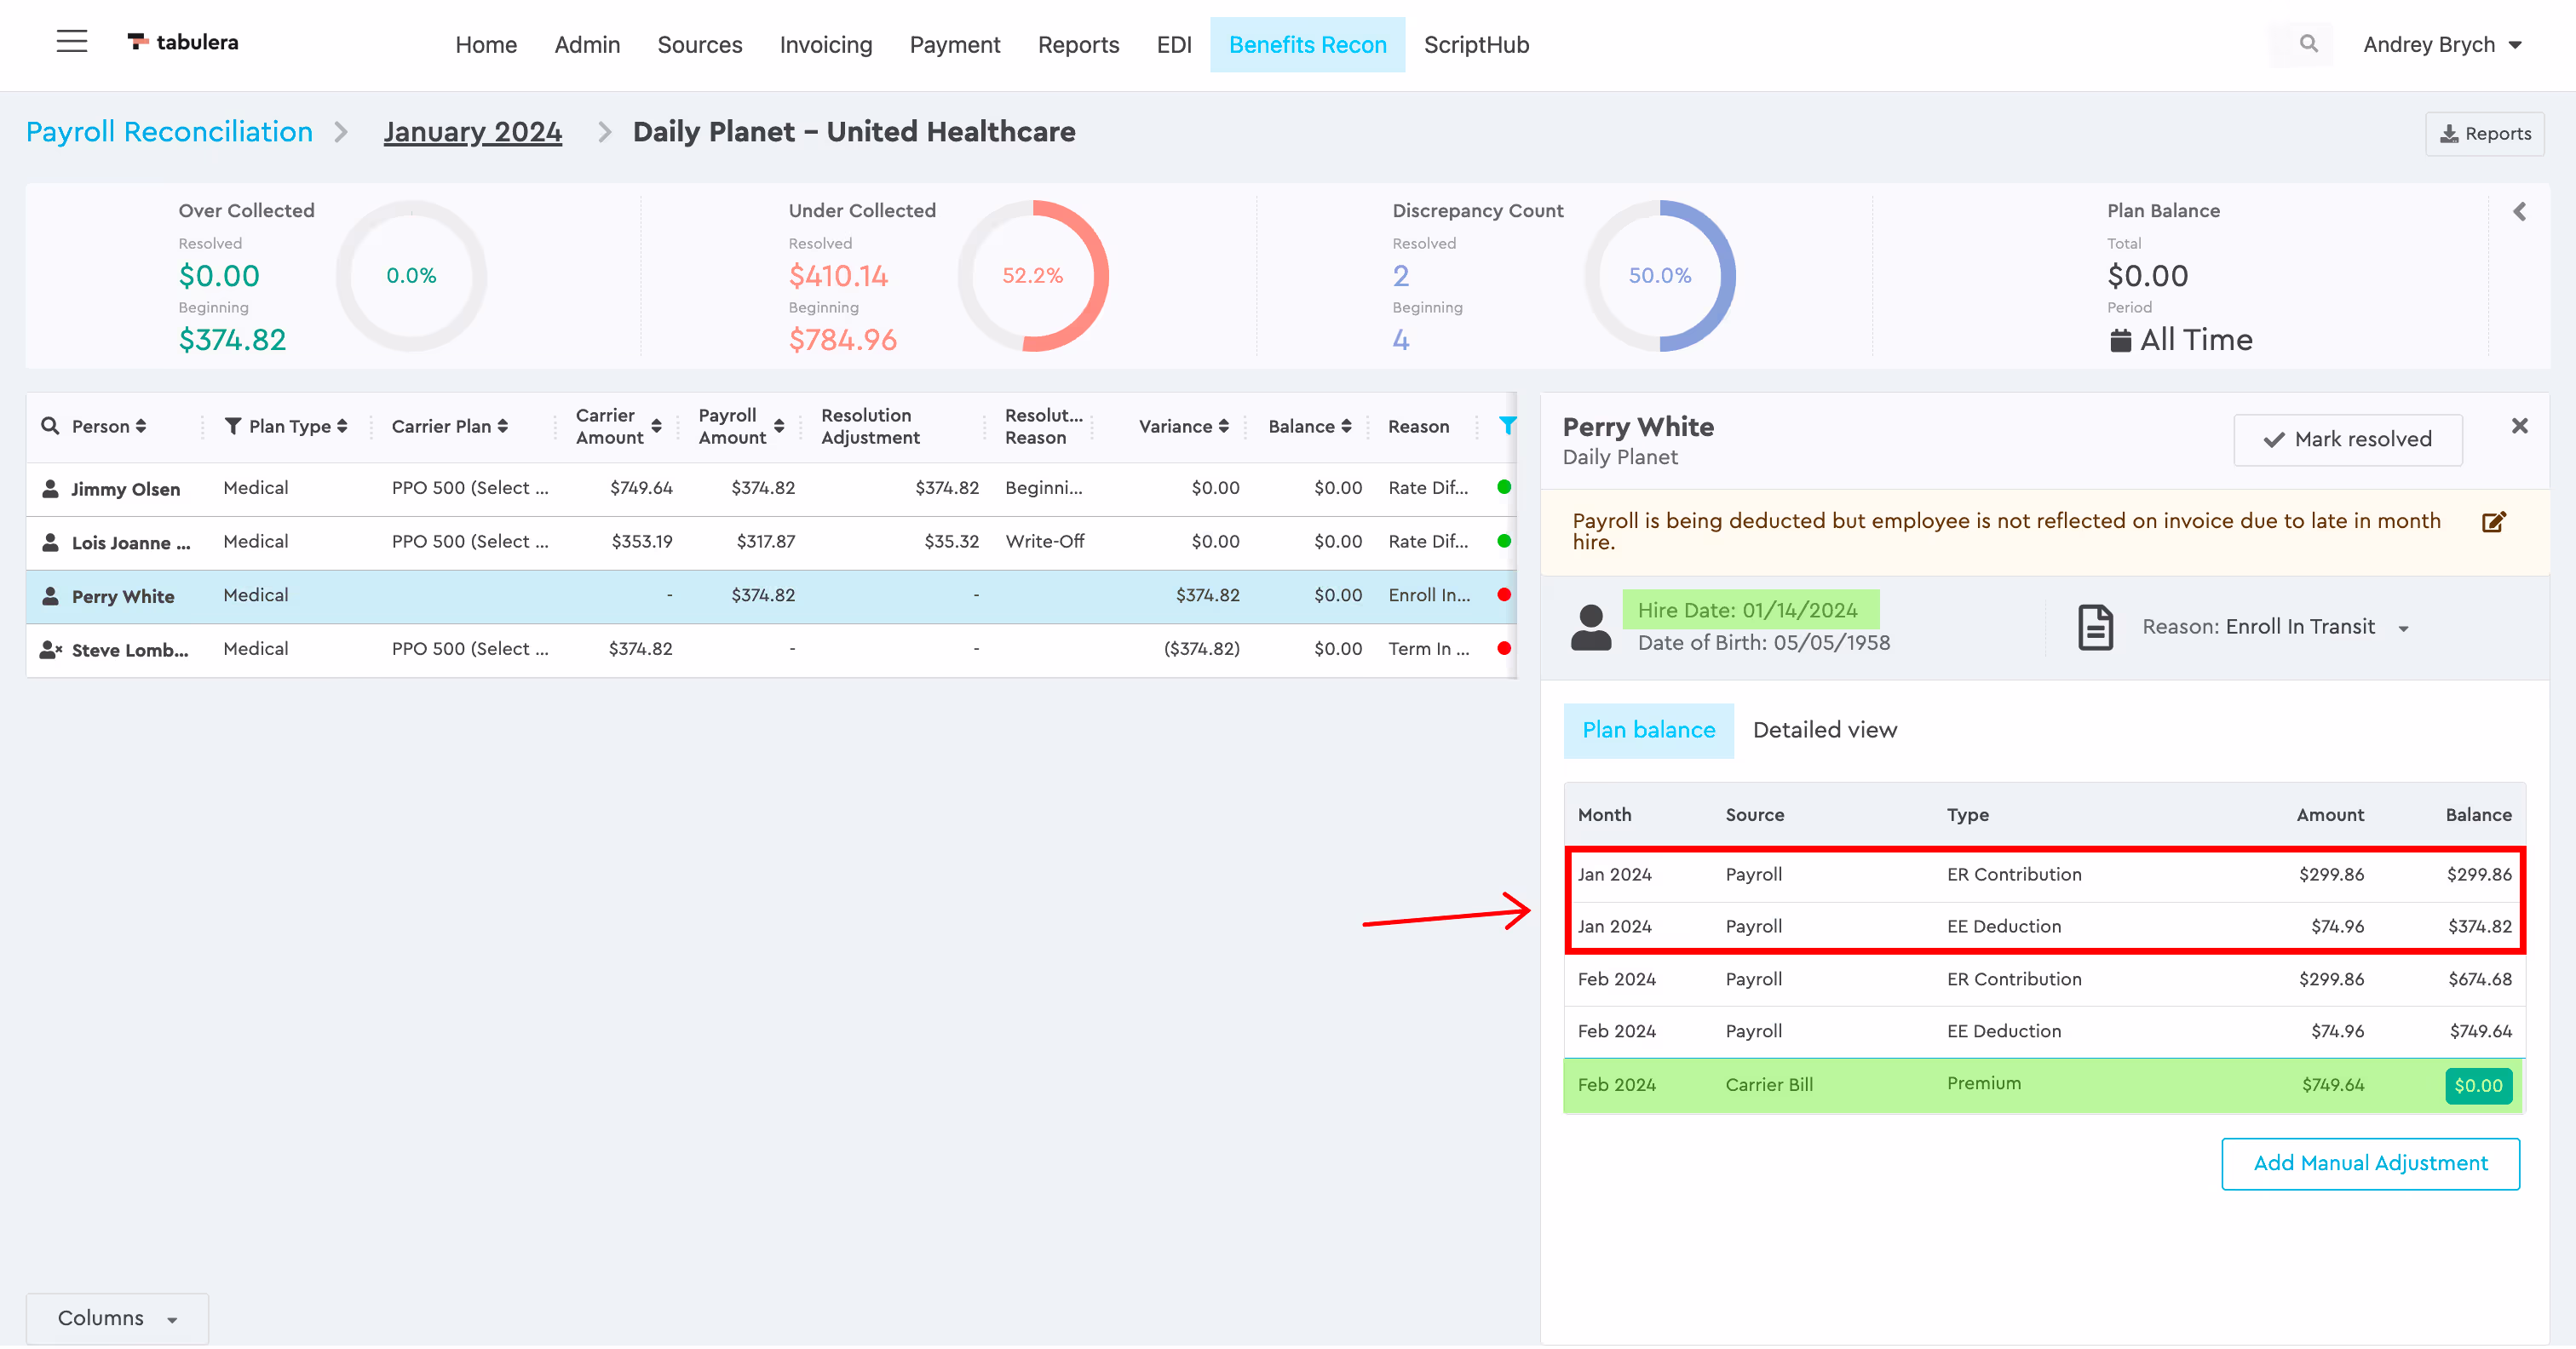
You can validate his hire date and details, but also notice, since the February invoices have already been uploaded, that the Carrier has retroactively billed for January. We'll click on 'Manually Resolved' for January with no manual adjustments necessary, as we see his plan balance is zero by February 2024.

Termination in transit
Finally, we’ll Click on Steve Lombard as his Status is also “Unresolved” with a Variance Reason as “Term In Transit”. Steve looks to be a late December termination and we, in fact, see that in February the carrier has provided the credit to refund the January Premium showing Steve has a zero Plan Balance. We can mark Steve as “Manually Resolved”.
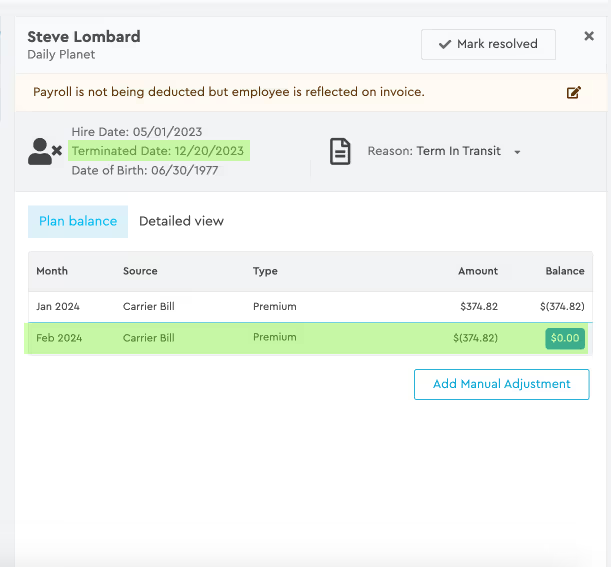
At the top of the page, the Over Collected, Under Collected Beginning and Resolved Amounts, and Beginning and Resolved Item Counts equal each other, indicating we have completed the reconciliation of the Daily Planet’s UHC January Invoice.
Reports
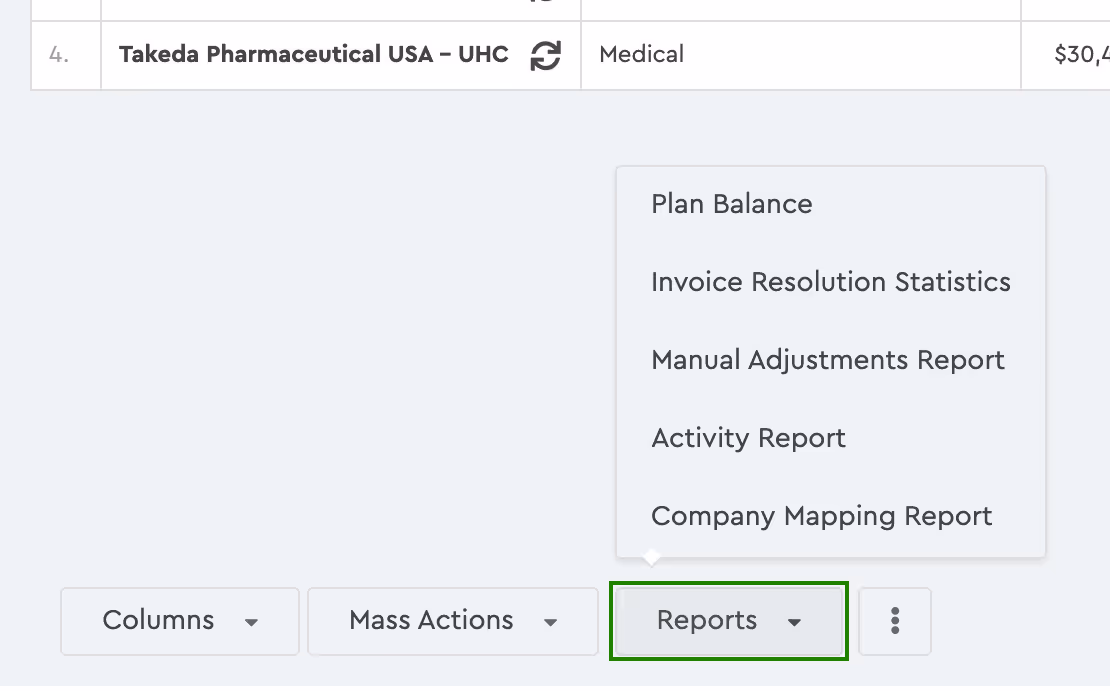
The Report button has been moved to the bottom of the screen in the latest update. Clicking it reveals several reporting options, depending on the scope:
Company-Wide Reports
These cover data across all invoices:
- Plan Balance Report
Shows total plan costs by employee over a given period. You can break it down by carrier or by company. - Invoice Resolution Statistics
See how well the platform auto-matched employees. It’s a good way to confirm your plan configuration is working correctly. - Manual Adjustments Report
Lists any manual entries made to adjust plan balances. Useful for finance or audit teams. - Activity Report
A full log of all actions taken by users in the system. Every step is recorded.
Invoice-Specific Reports
These are tied to the invoice currently being reviewed:
- Benefits Reconciliation Report
Shows the total carrier invoice amount and any Manual Adjustments made to match it. This report also highlights any in-transit items and is typically shared with your Accounting Department for reconciliation or GL entries. - Source Report
Exports all raw source data linked to the current invoice. - Activity Report
Shows user actions specific to this invoice—what was done, when, and by whom.
Conclusion
In conclusion, by following these simple steps, you can easily reconcile employee benefits plan invoices using the Tabulera Portal. The platform's user-friendly interface and straightforward upload process make it easy to quickly and accurately reconcile employee benefits against both your enrollment and payroll information.
Don't forget to check our Case Study, where we show How we saved $531.742 to our group of clients by eliminating benefit write-off's with our Benefits Reconciliation Module.
If you're an employer with fewer than 500 employees, there's an easy way to get started—sign up for a 30-day free trial and see how Tabulera can streamline your benefits reconciliation process from day one.