April 15, 2025
Uploading Source Data
The first step in using Tabulera’s Benefits Reconciliation Platform is uploading your source documents. Depending on the type of reconciliation selected, you may need to upload up to four types of documents.
Uploading Enrollment, Payroll and COBRA Remittance Data
The process for uploading Enrollment and Payroll data is identical. These files are typically generated from your Enrollment, HRIS, Payroll and COBRA vendors.
Before uploading, please download and use our file template to ensure the required fields are included.
→ Download Enrollment File Requirements
→ Download Payroll File Requirements
→ Download COBRA Remittance File Requirements
File Upload Process
- Go to the Sources menu in the Tabulera platform.
- Select the Source type (Payroll, Enrollment or COBRA).
- Choose the period you are uploading the file for.
- Click Upload File and locate the file on your device.
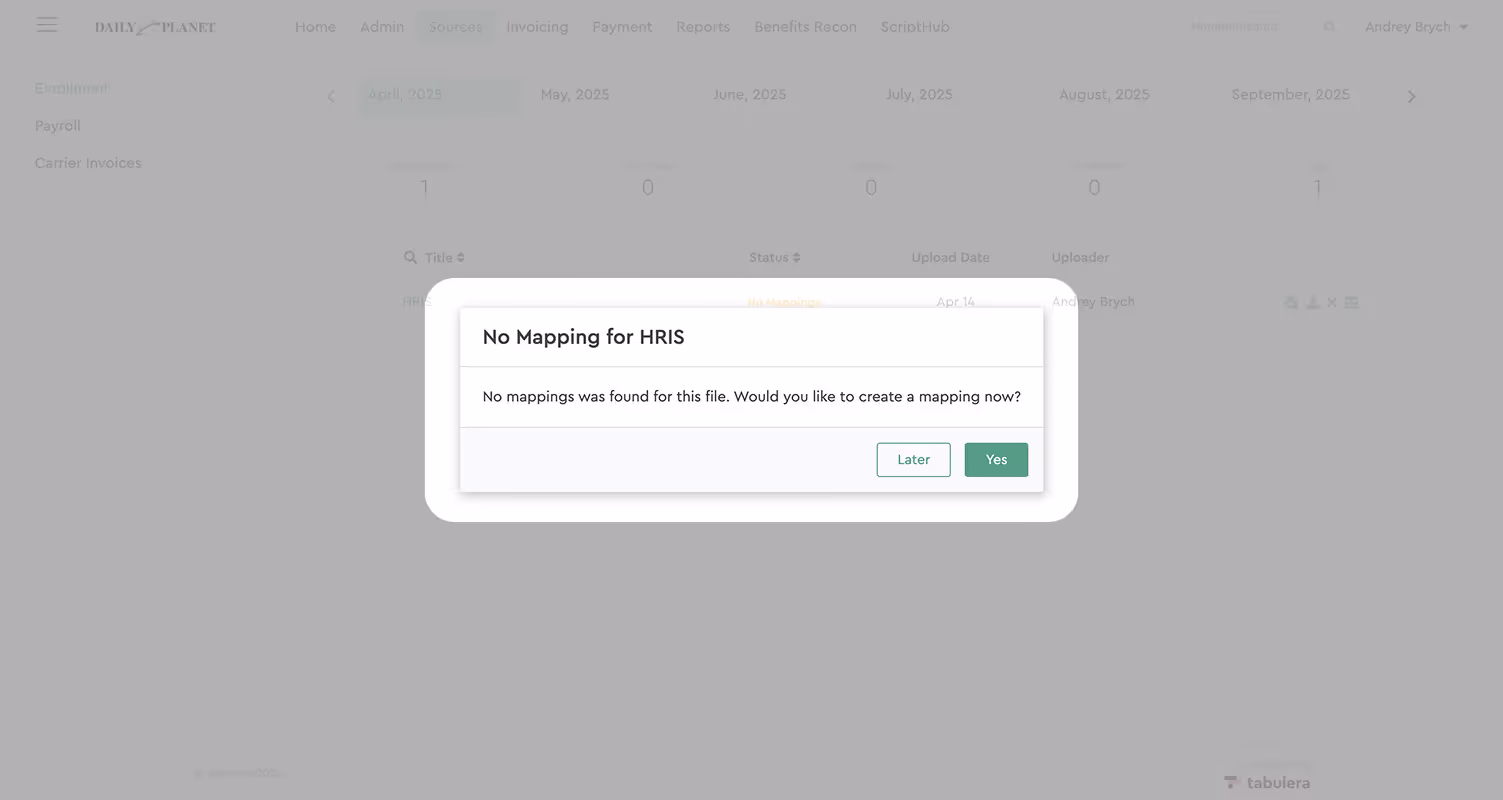
[[Note]]If this is your first upload, a modal window will appear prompting you to complete the file mapping. For subsequent uploads, click the Mapping button to open the mapping wizard.[[/Note]]
Mapping Your Data
Data mapping means telling the system which columns in your file match the fields Tabulera needs—like saying “this column is the employee name” or “this one is the plan type.”
The mapping process is identical for Payroll and Enrollment. Mapping is typically done once, unless the file format changes. Tabulera’s built-in AI assists in mapping most fields automatically.
Let’s quickly review the mapping wizards interface.
- The left panel displays both required and optional fields.
- Mandatory fields are marked with a red asterisk (*).
- [[Error]]Red highlights indicate a required field that hasn’t been mapped yet.[[/Error]]
- [[Warning]]Orange highlights indicate optional but recommended fields that are still unmapped.[[/Warning]]
- Click any unmapped field and select the corresponding column from your file.
- The right panel displays a preview of the values in that column. In some cases, you may need to help match these values to the format Tabulera expects.
Once all required columns and values are mapped, click **Submit Mapping**. You’ll be returned to the Sources menu and the file status will update to **Completed**.

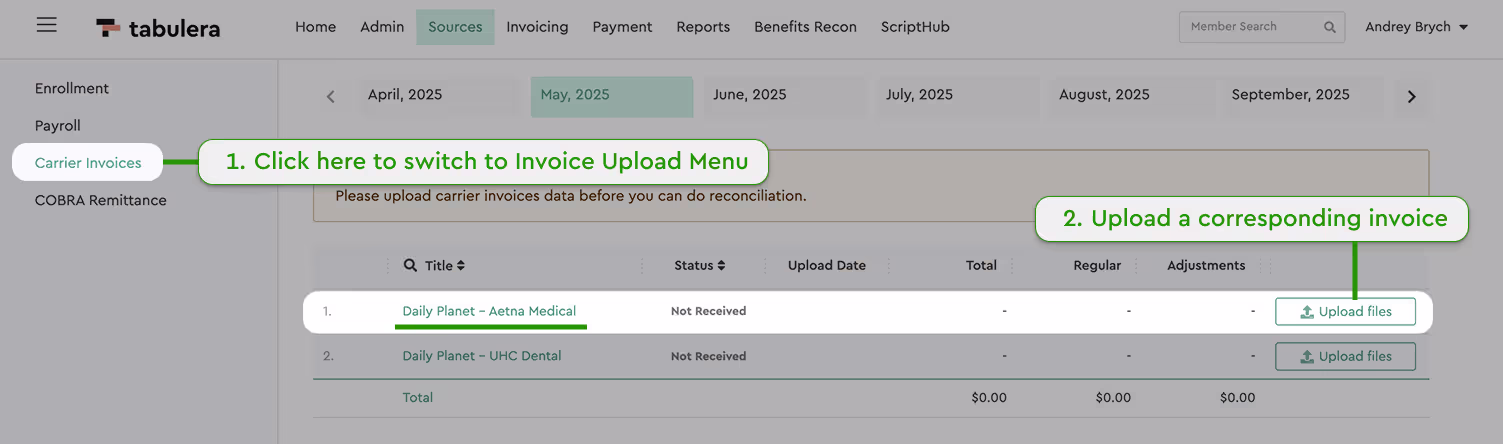
Next Let’s switch to the Carrier Invoice Section.
Uploading Carrier Invoices
To upload a carrier invoice:
- Go to the Carrier Invoices section.
- Click Upload Files and select the invoice file.
[[Note]]The Starter Plan supports CSV and XLSX formats.[[/Note]]
If it’s your first time uploading a specific invoice format, you’ll need to complete the mapping process. Future uploads will not require remapping unless the format changes.
Click the Mapping button to launch the wizard.
Locating Member Tables
Tabulera’s built-in AI will attempt to auto-detect the tables containing member data. If the selection isn’t accurate, you can click Remove and manually select the correct table.
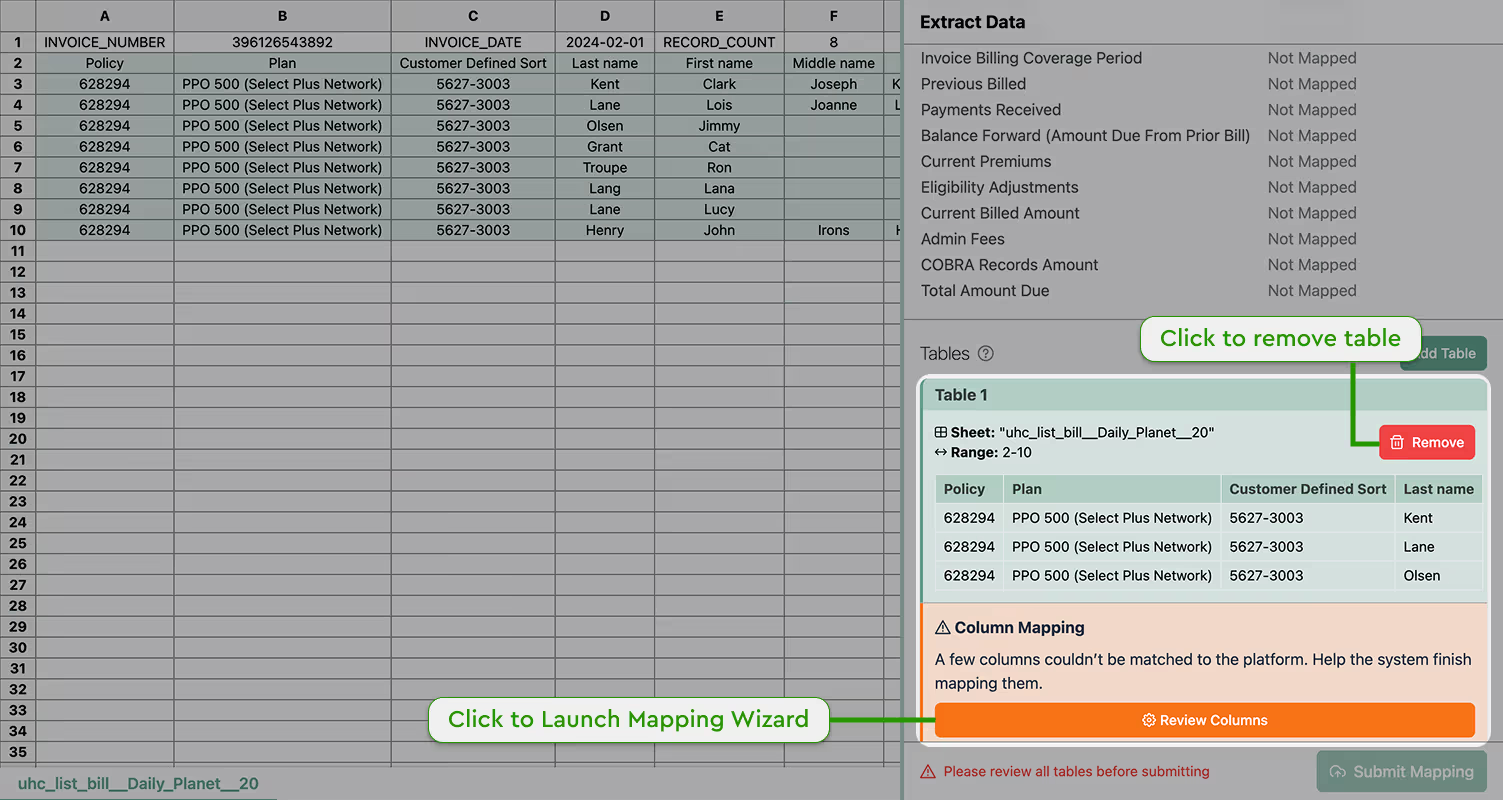
To Add and Remove a Table:
- Click once on the header row.
- Click again on the last row of the table.
- If the invoice includes multiple tabs, navigate them just like in Excel.
- You may select more than one table.
Mapping Invoice Columns
After selecting a table, you’ll see an orange section indicating that the columns aren’t yet mapped. Click Review Columns to launch the mapping wizard.
- [[Error]]Red highlights = required columns. [[/Error]]
- [[Warning]]Orange highlights = optional but useful. [[/Warning]]
Click the dropdown next to each field and select the corresponding column in your invoice.
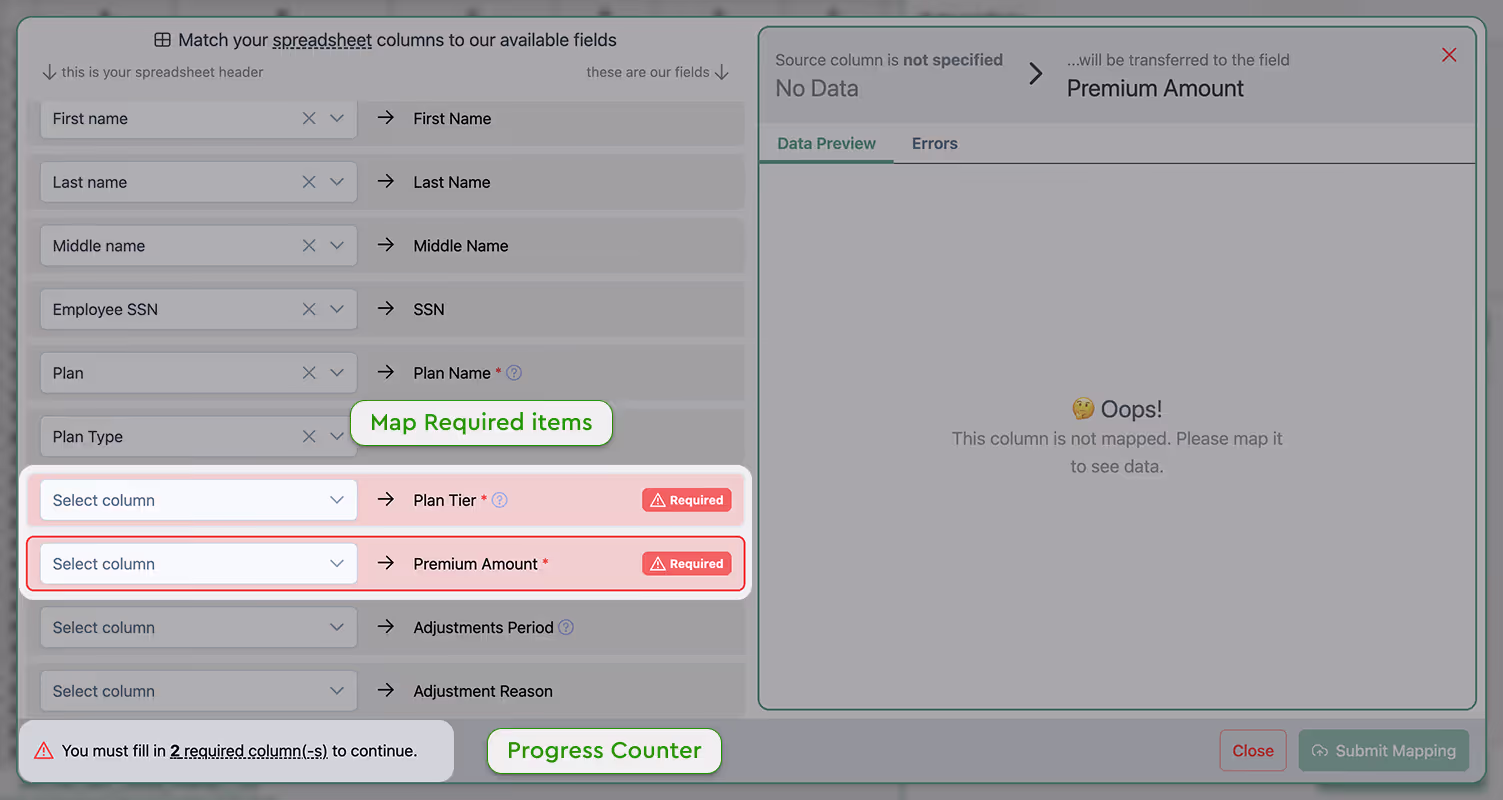
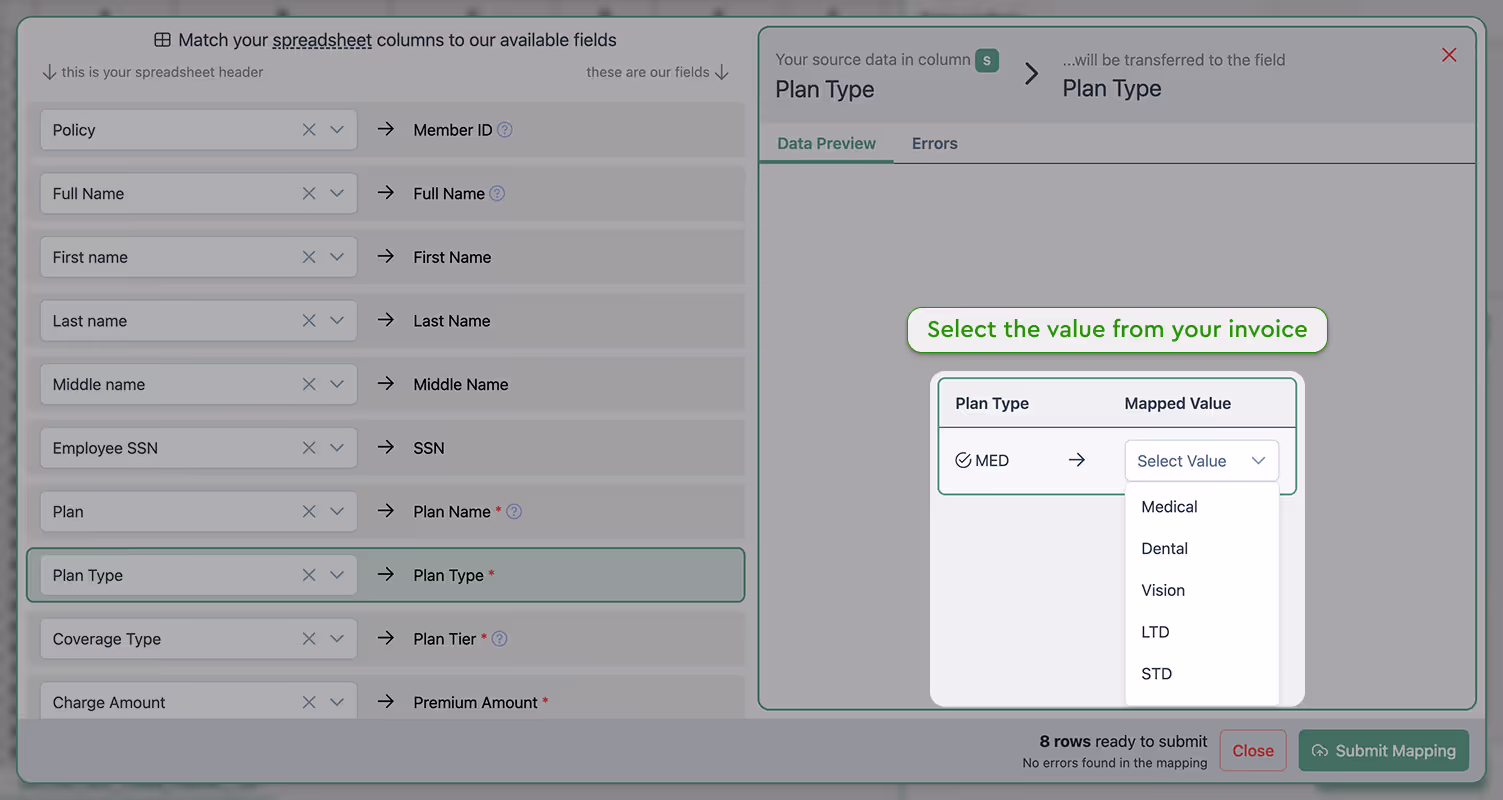
Mapping Invoice Values
Next, check any lines marked with a red asterisk (*). These values must be reviewed and confirmed using the right-side panel. Assign any unmapped values as needed.
Next, check any lines marked with a red asterisk (*). These values must be reviewed and confirmed using the right-side panel. Assign any unmapped values as needed.
Once mapping is complete:
- The Column Mapping Status will turn green.
- Repeat the process for each table in the file.
- Click Submit Mapping when done.

You’ll return to the Sources menu and the invoice status will update to Completed. Repeat for any additional invoices you plan to reconcile.
That’s it! You’re now ready to move on to the Benefits Reconciliation application.