February 16, 2024
Employee and Plan Mapping
In this guide, you will learn how to efficiently conduct Plan Mapping, Member Mapping, and Plan Merge inside Tabulera's Benefits Reconciliation Module, ensuring seamless alignment between enrollment, payroll, and carrier invoice data.
Plan Mapping
Tabulera implementation team takes care of the initial plan mapping process, but maintaining accuracy requires periodic checks. To ensure ongoing precision and automatic matching, we recommend conducting monthly reviews, especially if new Plans are added or discrepancies in the data between systems occur. Here's how to perform this operation:
- Go to the Benefits Reconciliation Application
- Toggle to the Old UI (Legacy UI).

- Select your company type - choose either "PEO" or "ASO" from the dropdown menu. Single employer clients can skip this step.

- Choose the date and the Carrier Invoice you want to map.
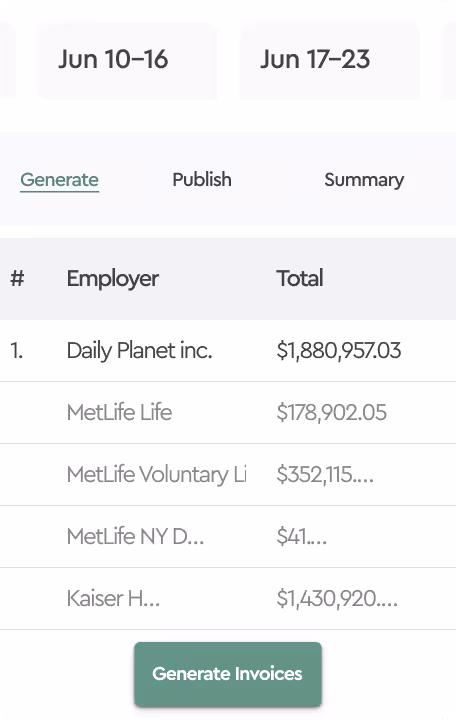
- Click the "Generate" button. For large Master plans, generation might take a minute.
- The view will display all employees alongside Enrollment, Payroll, and Invoice data sorted by plan types.
- Navigate to the Plans tab.
- In the Statistical Panel, verify if the "Total Plans Number" matches the "Confirmed Plans" number. If they don’t match, manually check which Plan Codes don’t match the corresponding source data.

- Review each of the source data tabs and verify if any "Confirm" button is grayed out (as displayed on the image below). If a Plan Code is crossed out, it will not be reflected on the reconciliation report and can be disregarded for now. Reasons for this exclusion may include duplicate plan types, legacy plan names, or the decision not to reconcile this plan at the moment.

- When encountering an unmapped plan code, select its type from the dropdown menu. If the plan lacks a typical name, opt for "Custom Plan Type" and assign it a custom name. Then, choose the corresponding "Invoice name" from the dropdown menu, unless assigned automatically. Ensure that the names align consistently across all three source data tabs. This alignment facilitates mapping; when Recon detects identical names within one Plan Type, it automatically merges those entries, eliminating the need for manual merging under the "Details" tab. Finally, click "Confirm". The "Confirmed" button will then turn green, signifying successful mapping.
- Ensure that all three data sources have all Plan Codes confirmed and that the "Total Plans" number equals the "Confirmed Plans" number in the Statistical Panel.
- After any edits of the mapping, if you want the data to be displayed correctly in the Reconciliation Module, refresh the page with the button located in the bottom left corner of the “Details” tab.


Member Mapping
With our latest update, Person Mapping has become more intuitive and integrated directly into the current UI, eliminating the need to switch between interfaces.
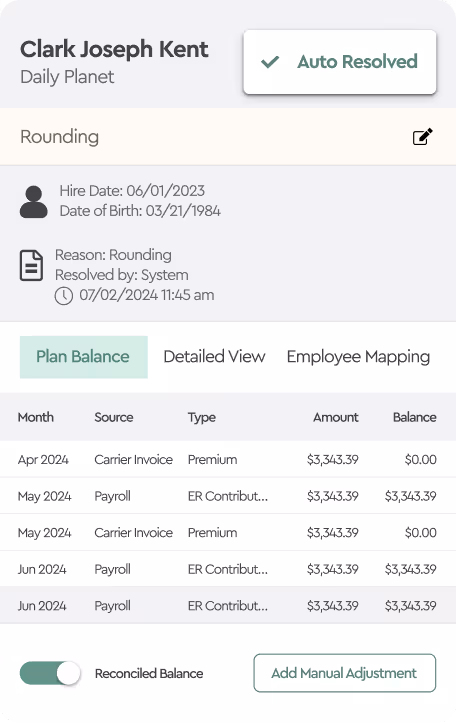
When performing reconciliation, you might encounter employees with a red icon in the Employee List View. This indicates that an employee appears on an invoice but doesn't have a corresponding match in the HRIS database within the Tabulera system. This situation often arises when an employee is listed under different names across your invoice, payroll, and enrollment systems, preventing automatic matching by the Platform.
To resolve this, you need to manually map the employee records:
- Filter the Employee View: Start by filtering the Employee View to display only the Unmapped Members. You can do this by clicking on the icon in the Person column and selecting "Not Enrolled Members."
- Mapping the Employee: Select any employee from the filtered list. In the panel that slides out from the right, go to the Member Mapping tab. If you know the employee's name as it appears in the HRIS system, start typing it, and select the correct match from the list provided by the Platform. For example, if the invoice lists "Cat Grant" and the HRIS lists "Catty Grant-Olsen," you can map these records together. If you're unsure of the exact name, you can make several attempts, and the Platform will narrow down your search. Additionally, if you have the employee's SSN, you can enter the details manually.
- Ignore Mapping: If necessary, you can choose to ignore mapping for certain employees, such as those under COBRA, by selecting the “Ignore the Mapping for this Member” option.
- Advanced Options: For more complex scenarios, use the Advanced Options:some text
- Activate this mapping only for the specified date range: Useful when an employee changes companies and you need the system to recognize that the employee works in a different company after a certain date.
- Apply Mapping to this Member Plan Only: This option is ideal if you want to map an employee only for a specific invoice (e.g., this month/year).
- Finalizing the Mapping: Once the correct employee is selected, click the Create Mapping button. The red icon next to the employee will change to a clock icon, indicating that the mapping was successful.
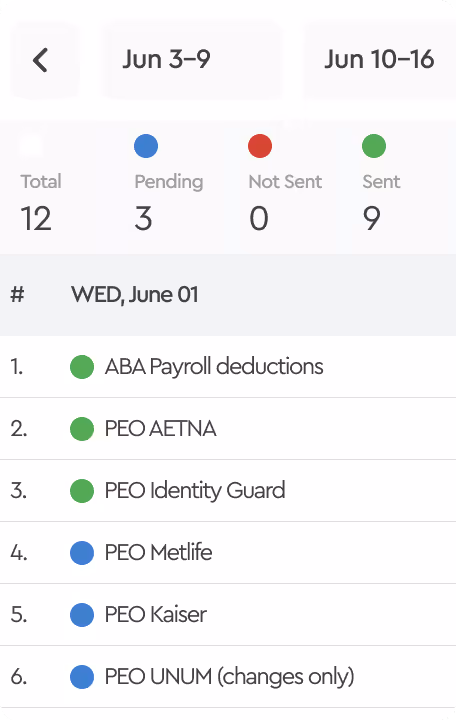
- Regenerate Reports: After mapping, it’s important to regenerate the reconciliation report. To do this, click on the Payroll/Enrollment Reconciliation Button in the Top Navigation menu, then select the Regenerate Button next to the invoice you've been working on. It’s recommended to map as many employees as possible before regenerating the reports to avoid repeating this step multiple times.
- View All Mappings: To review all Member Mapping configurations for a specific invoice, go inside the invoice and click the "Configure" Button at the bottom of the screen, then select "Member Mapping." Here, you can see all your mapped employees. If you made any accidental mappings, simply click the "Remove" button next to the employee, and you can remap the employee as needed. Remember, after any mapping changes, you should regenerate the reconciliation report to ensure all data is up to date.
Plan Merge

Occasionally, you may encounter an employee with two or more similarly named plans under their name (for example A D & D and Life A D & D). In such cases, one plan may have a carrier invoice amount but no payroll amount, while the other plan may have the payroll amount but no invoice amounts. This discrepancy indicates unmerged plans. Follow this procedure to merge the plans:
- Access the Benefits Reconciliation Application.
- Toggle to the Old UI
- Depending on your company type, select "PEO" or "ASO" from the dropdown menu. Single employer clients can skip this step.
- Choose the date and the Carrier Invoice you want to work on, then click "Generate".
- Utilize the “Find Person” feature to locate the employee with unmerged plans. Simply type in the employee's name and click the “Find” button, or search for them manually.

- Hover your mouse over the Plan name in the enrollment section. When the mouse cursor changes, click on the plan name. A “Merge” button will appear in the Carrier Invoice section. Click it to merge the two plans. Repeat for the remaining plans you wish to merge.
- If this action is performed for one employee, it will automatically be applied to other employees with the same unmerged case.
- After any edits of the mapping, if you want the data to be displayed correctly in the Reconciliation Module, refresh the page with the button located in the bottom left corner.
- Let’s make sure the plans have been merged correctly

- To unmerge the plans, navigate to the Mapping Tab in the Old . Find the plan name that you wish to unmerge and click the "Remove" button.